Android下访问网络资源和一些注意事项
这里只说明了最简单的网络访问资源的方式,与服务端交互在后面讲述。
- Andriod中访问网络中资源的基本步骤
-
① 通过调用
URL.openConnection()获取一个HttpURLConnection连接对象 - ② 设置一些链接对象的配置参数,比如:超时时间和请求方式;HttpURLConnection中默认的请求方式是GET
- ③ 获取服务端响应码,并根据响应码进行操作
-
④ 响应成功,拿到响应流
conn.getInputStream(),并进行处理。 -
代码如下
try { URL url = new URL(path); // 1. 获取一个HttpURLConnection链接对象,通过调用URL.openConnection() HttpURLConnection conn = (HttpURLConnection) url.openConnection(); // 2. 设置网络链接对象的一些参数 conn.setRequestMethod("GET"); conn.setConnectTimeout(5 * 1000); // 3. 获取服务器的响应码 int responseCode = conn.getResponseCode(); if (200 == responseCode) { // 响应成功 // 4. 解析相应结果 InputStream is = conn.getInputStream(); } } catch (Exception e) { e.printStackTrace(); } - 特别需要注意的几点
-
★在主线程中写网络访问时,会报异常:
android.os.NetworkOnMainThreadException - 解决办法:将网络访问放置到子线程中。
-
★在主线程中修改UI时,会报异常:
android.view.ViewRootImpl$CalledFromWrongThreadException: Only the original thread that created a view hierarchy can touch its views. - 解决办法:异常报告中说的很明白, 只能在主线程(UI线程)中创建View的层级。
-
Andoird中为我们提供了异步消息处理线程的技术,只要涉及到了
Handler和Message
Android下异步消息处理线程技术
在Android开发中,常常有这样的场景,访问网络,获取资源,然后把获取的资源(图片、文字)显示在手机屏幕上。
但是由于网络访问是个耗时操作,在Android4.0以后,Google就强制要求不能够在主线程写网络访问。而在子线程中获取到需要的资源后,又不能够在子线程中更新UI界面(比如显示的文字、图片等)。
这是异步消息处理线程技术也应运而生。主要涉及到两个类Handler和Message,它们使用的方法超级简单,但是里面涉及的原理确实非常的复杂。这里先简要的介绍如何使用异步消息处理线程技术,如果在子线程中更新UI界面。
有以下几种使用方式
- 方式一:Handler和Message
-
① 实例化一个Handler并重写handlerMessage()方法
private Handler handler = new Handler() { public void handleMessage(android.os.Message msg) { // 处理消息 }; }; -
② 在子线程中获取或创建消息,并使用handler对象发送。
// 获取消息的方式有多种
// Message msg = new Message();
// Handler.obtainMessage()
// 但是谷歌的建议是:While the constructor of Message is public, the best way to get one of these is to call Message.obtain() or one of the Handler.obtainMessage() methods,
Message msg = Message.obtain();
msg.obj = result;
handler.sendMessage(msg);
- 方式二:
-
在子线程中直接调用Activity.runOnUiThread(Runnable action)方法
runOnUiThread(new Runnable() { @Override public void run() { // 更新UI } }); - 方式三:
-
在子线程中调用View的post()方法
tv_content.post(new Runnable() { @Override public void run() { // 更新UI tv_content.setText(result); } }); - 方式四:Handler的post()方法
-
① 创建一个Handler成员变量
private Handler handler = new Handler();
-
② 在子线程中调动post()方法
handler.post(new Runnable() {
    @Override
    public void run() {
        // 更新UI
        tv_content.setText(result);
    }
});
虽然方式有很多,但是不管是那种方法在子线程中更新UI,其实背后的原理都是相同的,必须借助异步消息处理的机制来实现。
这是Handler中post的源码:
 public final boolean post(Runnable r)
  {
      return  sendMessageDelayed(getPostMessage(r), 0);
   }
这是View中post的源码:
public boolean post(Runnable action) {
       final AttachInfo attachInfo = mAttachInfo;
       if (attachInfo != null) {
           return attachInfo.mHandler.post(action);
       }
       // Assume that post will succeed later
       ViewRootImpl.getRunQueue().post(action);
       return true;
   }
这是Activity中runOnUiThread的源码
public final void runOnUiThread(Runnable action) {
       if (Thread.currentThread() != mUiThread) {
           mHandler.post(action);
       } else {
           action.run();
       }
   }
是不是惊人的相似?
Android下异步消息处理线程技术的基本原理
为什么使用异步消息处理的方式就可以对UI进行操作了呢?
这是由于Handler总是依附于创建时所在的线程,比如我们的Handler是在主线程中创建的,而在子线程中又无法直接对UI进行操作,于是我们就通过一系列的发送消息、入队、出队等环节,最后调用到了Handler的handleMessage()方法中,这时的handleMessage()方法已经是在主线程中运行的,因而我们当然可以在这里进行UI操作了。
整个异步消息处理流程的示意图如下图所示: 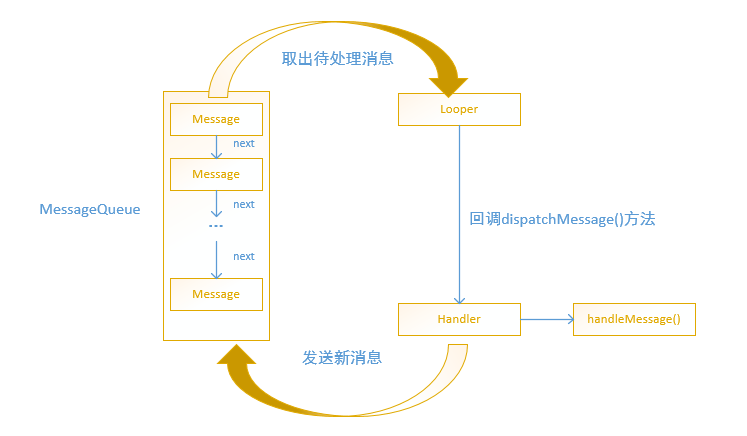
模仿新闻客户端小案例
写一个模仿网易新闻客户端的小案例,只要目的是把之前的知识全部串联起来。
效果图如下:

- 用到的知识点有:
- ① RelativeLayout相对布局
- ② 请求网络资源(HttpUrlConnection)
- ③ XmlPullParser解析XML数据 (得到Bean集合)
- ④ ListView展示数据 (相当于View视图层)
- ⑤ BaseAdapter适配器(相当于Controller控制器层)
- ⑥ 异步消息处理线程技术(Handler、Message)
- 开发步骤:
- ① 确定好客户端与服务端交换数据的格式为XML
- ② 确定好服务端资源是否能够访问到
- ③ 画主界面UI
- ④ 画Item条目UI
- ⑤ 请求网络,获取到结果流
- ⑥ 解析XML,返回要被展示的数据集合
- ⑦ 写ListView的适配器
- ⑧ 异步消息处理线程技术,为ListView设置适配器
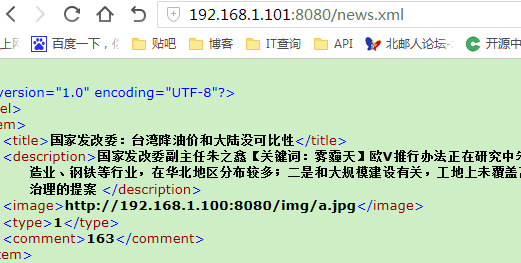
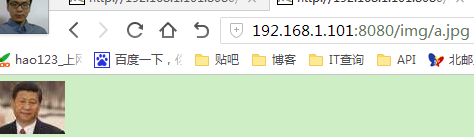
① 确定好客户端与服务端交换数据的格式为XML 使用浏览器确认资源是否存在
<channel>
<item>
  <title>国家发改委:台湾降油价和大陆没可比性</title>
  <description>国家发改委副主任朱之鑫【关键词:雾霾天】欧V推行办法正在研究中朱之鑫说,雾霾天气有三方面成因:一是中国高耗能产业和高污染产业较多,如水泥、制造业、钢铁等行业,在华北地区分布较多;二是和大规模建设有关,工地上未覆盖苫布造成扬尘;三是汽车尾气增加了细微颗粒物排放。民盟中央提交的一份关于大气污染治理的提案
  </description>
  <image>http://192.168.1.100:8080/img/a.jpg</image>
  <type>1</type>
  <comment>163</comment>
  </item>
</channel>
② 确定好服务端资源是否能够访问到
③ 画主界面UI 很简单里面只有一个ListView
<RelativeLayout xmlns:android="http://schemas.android.com/apk/res/android" xmlns:tools="http://schemas.android.com/tools" android:layout_width="match_parent" android:layout_height="match_parent" >
    <ListView  android:id="@+id/lv" android:layout_width="match_parent" android:layout_height="match_parent" >
    </ListView>
</RelativeLayout>
④ 画Item条目UI
<?xml version="1.0" encoding="utf-8"?>
<RelativeLayout xmlns:android="http://schemas.android.com/apk/res/android" android:layout_width="match_parent" android:layout_height="80dp" >
    <com.loopj.android.image.SmartImageView  android:id="@+id/iv_icon" android:layout_width="80dp" android:layout_height="80dp" android:src="@drawable/ic_launcher" />
    <TextView  android:id="@+id/tv_title" android:layout_width="match_parent" android:layout_height="wrap_content" android:layout_marginLeft="5dp" android:layout_marginRight="5dp" android:layout_marginTop="10dp" android:layout_toRightOf="@id/iv_icon" android:ellipsize="end" android:singleLine="true" android:text="测试测试测试测试测试测试测试测试" android:textColor="#000000" android:textSize="22sp" />
    <TextView  android:id="@+id/tv_content" android:layout_width="match_parent" android:layout_height="wrap_content" android:layout_below="@id/tv_title" android:layout_marginLeft="5dp" android:layout_marginRight="5dp" android:layout_toRightOf="@id/iv_icon" android:maxLines="2" android:text="测试测试测试测试测试测试测试测试测试测试" android:textColor="#9E9E9E" android:textSize="17sp" />
    <TextView  android:id="@+id/tv_type" android:layout_width="wrap_content" android:layout_height="wrap_content" android:layout_alignBottom="@id/iv_icon" android:layout_alignParentRight="true" android:text="专题" android:textColor="#FF0000" android:textSize="15sp" />
</RelativeLayout>
⑤ 请求网络,获取到结果流
/** * 请求数据 */
private void initData() {
    // 子线程
    new Thread(new Runnable() {
        @Override
        public void run() {
            // 访问网络
            try {
                // 获取链接对象
                URL url = new URL(dataPath);
                HttpURLConnection conn = (HttpURLConnection) url.openConnection();
                // 配置链接对象
                conn.setReadTimeout(5 * 1000);
                conn.setRequestMethod("GET");
                // 获取响应码
                int responseCode = conn.getResponseCode();
                if (responseCode == 200) {
                    // 获取结果流
                    InputStream is = conn.getInputStream();
                    // 获取到集合
                    newsBeanList = parserXML(is);
                    // 发送消息表明数据获取成功
                    handler.sendEmptyMessage(SUCCESS);
                }
            } catch (Exception e) {
                e.printStackTrace();
            }
        }
    }).start();
}
⑥ 解析XML,返回要被展示的数据集合
/** * 解析XML数据,并将数据封装到实体bean中 * * @param is * @return * @throws Exception */
private List<NewsBean> parserXML(InputStream is) throws Exception {
    // 获取到解析器
    XmlPullParser parser = Xml.newPullParser();
    // 设置解析器的参数
    parser.setInput(is, "UTF-8");
    // 获取到事件
    int eventType = parser.getEventType();
    // 定义
    List<NewsBean> newsBeanList = null;
    NewsBean newsBean = null;
    // 循环处理事件,并封装成为实体bean
    while (eventType != XmlPullParser.END_DOCUMENT) {
        switch (eventType) {
        case XmlPullParser.START_TAG:
            if ("channel".equals(parser.getName())) {
                // 初始化集合
                newsBeanList = new ArrayList<NewsBean>();
            } else if ("item".equals(parser.getName())) {
                // 初始化bean
                newsBean = new NewsBean();
            } else if ("title".equals(parser.getName())) {
                newsBean.setTitle(parser.nextText());
            } else if ("description".equals(parser.getName())) {
                newsBean.setDescription(parser.nextText());
            } else if ("image".equals(parser.getName())) {
                newsBean.setImage(parser.nextText());
            } else if ("type".equals(parser.getName())) {
                newsBean.setType(parser.nextText());
            } else if ("comment".equals(parser.getName())) {
                newsBean.setComment(parser.nextText());
            }
            break;
        case XmlPullParser.END_TAG:
            if ("item".equals(parser.getName())) {
                // 将bean添加到集合中
                newsBeanList.add(newsBean);
            } else if ("channel".equals(parser.getName())) {
                // 返回集合
                return newsBeanList;
            }
            break;
        default:
            break;
        }
        // 循环事件
        eventType = parser.next();
    }
    return null;
}
⑦ 写ListView的适配器,在设置图片时,使用到了SmartImageView开源项目
class MyAdapter extends BaseAdapter {
    @Override
    public int getCount() {
        return newsBeanList.size();
    }
    @Override
    public Object getItem(int position) {
        return null;
    }
    @Override
    public long getItemId(int position) {
        return 0;
    }
    @Override
    public View getView(int position, View convertView, ViewGroup parent) {
        View view = null;
        if (convertView == null) {
            view = View.inflate(getApplicationContext(), R.layout.item, null);
        } else {
            view = convertView;
        }
        SmartImageView iv_icon = (SmartImageView) view.findViewById(R.id.iv_icon);
        TextView tv_title = (TextView) view.findViewById(R.id.tv_title);
        TextView tv_content = (TextView) view.findViewById(R.id.tv_content);
        TextView tv_type = (TextView) view.findViewById(R.id.tv_type);
        // 获取集合中的数据,显示到控件上
        NewsBean bean = newsBeanList.get(position);
        tv_title.setText(bean.getTitle());
        tv_content.setText(bean.getDescription());
        tv_type.setText(bean.getType());
        iv_icon.setImageUrl(bean.getImage().replace("192.168.1.100", localhost));
        return view;
    }
}
⑧ 异步消息处理线程技术,为ListView设置适配器
private Handler handler = new Handler() {
    public void handleMessage(android.os.Message msg) {
        if (msg.what == SUCCESS) {
            // 为ListView设置适配器
            lv.setAdapter(new MyAdapter());
        }
    };
};
GET方式提交数据到服务器
简单的get请求
String username = et_username.getText().toString().trim();
String password = et_password.getText().toString().trim();
final String path = "http://192.168.1.101:8080/web/LoginServlet?username=" + username + "&password=" + password;
// 子线程
new Thread(new Runnable() {
    @Override
    public void run() {
        // 访问网络
        try {
            // 获取链接对象
            URL url = new URL(path);
            HttpURLConnection conn = (HttpURLConnection) url.openConnection();
            // 配置链接对象
            conn.setReadTimeout(5 * 1000);
            conn.setRequestMethod("GET");
            // 获取响应码
            int responseCode = conn.getResponseCode();
            if (responseCode == 200) {
                // 获取结果流
                InputStream is = conn.getInputStream();
                String result = streamToString(is);
                showToast(result);
            }
        } catch (Exception e) {
            e.printStackTrace();
        }
    }
}).start();
POST方式提交数据到服务器
post请求也比较简单,与get方式相比,也仅有小部分不同。
final String username = et_username.getText().toString().trim();
final String password = et_password.getText().toString().trim();
final String path = "http://192.168.1.101:8080/web/LoginServlet";
// 子线程
new Thread(new Runnable() {
    @Override
    public void run() {
        // 访问网络
        try {
            // 获取链接对象
            URL url = new URL(path);
            HttpURLConnection conn = (HttpURLConnection) url.openConnection();
            // 配置链接对象
            conn.setReadTimeout(5 * 1000);
            conn.setRequestMethod("POST");
            // ☆ 不同之处:设置POST请求的头信息
            String data = "username=" + username + "&password=" + password;
            conn.setRequestProperty("Content-Type", "application/x-www-form-urlencoded");
            conn.setRequestProperty("Content-Length", data.length() + "");
            // ☆ 不同之处:发送数据
            conn.setDoOutput(true);
            conn.getOutputStream().write(data.getBytes());
            // 获取响应码
            int responseCode = conn.getResponseCode();
            if (responseCode == 200) {
                // 获取结果流
                InputStream is = conn.getInputStream();
                String result = streamToString(is);
                showToast(result);
            }
        } catch (Exception e) {
            e.printStackTrace();
        }
    }
}).start();