解决交互的乱码
交互乱码的根本原因就是平台两端的字符编码不一致
- 需要注意的点:
-
Andriod使用HttpUrlConnection的Get和Post方式提交,都不会帮我们进行编码,如果有中文就会出现乱码。需要我们使用
URLEncoder.encode()方法对参数进行编码。
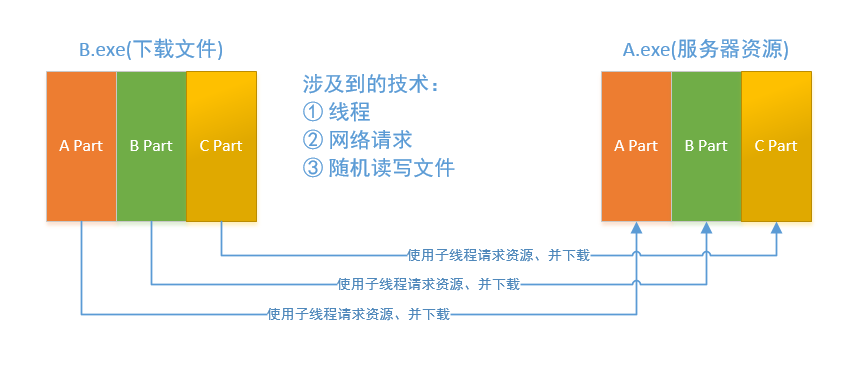
多线程下载-玩具程序
- 多线程下载的原理
-
其实多线程下载的原理还是比较简单的, ①根据服务器资源的大小,在客户端创建一个同样大小的空文件; ②根据下载文件的线程个数(N)将被下载文件在逻辑上分为N个区块,并计算好各个区块的开始索引和结束索引; ③使用
RandomAccessFile对象将指定的区块写入到客户端对应的区块中。 - 原理图如下:
-
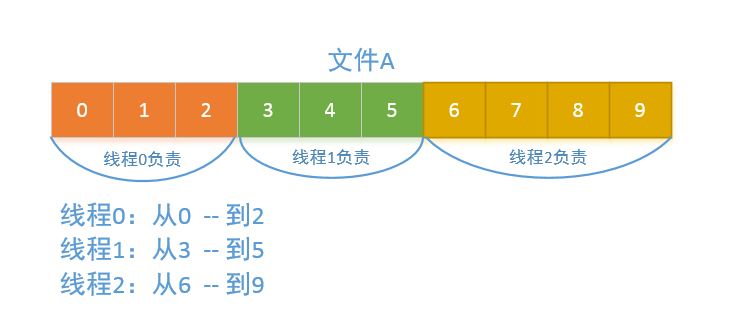
- 如何计算区块的开始索引和结束索引?
- 首先先看一张图,假设被下载文件长度为10,并开启3个线程下载;
- 注意:下载线程的个数不是越多,下载越快;这里的Demo以三个为例。
-
-
图中已经显示得很清楚了,每个线程下载那些区块的数据,接下来我们主需要把这些图片中的数据抽取成为代码就可以了。
// 线程数
int threadCount = 3;
// 得到文件的大小
int fileLength = 10;
// 计算出区块的大小
int blockSize = fielLength / threadCount;
// 计算出个区块的开始和结尾
线程0:0 * blockSize --- (0+1)*blockSize - 1
线程1:1 * blockSize --- (1+1)*blockSize - 1
线程2:2 * blockSize --- fileLength
// 可以总结出的公式为:
threadId * blockSize --- (threadId +1)*blockSize - 1
- 虽然原理已经讲解清楚了,但是还是有很多细节需要注意
- ① ★ (我写这个Demo的时候就在这里犯了错误) 假设我们的文件长10,那么我们请求下载文件的索引就是:0 - 9
- ② 如何获取文件的长度
- ③ 如何在客户端创建一个和服务器大小一样的空文件
- ④ 计算出区块的开始和结束索引
-
⑤为
HttpUrlConnection对象设置Range头信息,明确请求文件的开始与结束位置; -
⑥使用
RandomAccessFile对象的seek方法定位到指定的写入点
代码中省略了很多没有必要的注释,只保留了关键性的
// 多线程下载
public class MultiThreadedDownload {
    private static String path = "http://192.168.1.101:8080/FeiQ.exe";
    // 下载线程数
    private static final int threadCount = 3;
    public static void main(String[] args) throws Exception {
        new Thread() {
            public void run() {
                try {
                    URL url = new URL(path);
                    HttpURLConnection conn = (HttpURLConnection) url.openConnection();
                    conn.setReadTimeout(5 * 1000);
                    conn.setRequestMethod("GET");
                    int responseCode = conn.getResponseCode();
                    // 响应成功
                    if (200 == responseCode) {
                        // ★ 获取文件的长度
                        int fileLength = conn.getContentLength();
                        System.out.println("文件大小:" + fileLength);
                        // ★ 根据服务器资源的大小,在客户端创建一个同样大小的空文件
                        String fileName = UUID.randomUUID().toString() + ".exe";
                        // ☆ 这里使用到了RandomAccessFile对象,可以使用它随机读写文件,详细的请看JDK
                        RandomAccessFile emptyFile = new RandomAccessFile(fileName, "rw");
                        // ☆ 设置空文件大小
                        emptyFile.setLength(fileLength);
                        // ☆ 根据线程数目,计算出下载的区块大小
                        int blockSize = fileLength / threadCount;
                        for (int threadId = 0; threadId < threadCount; threadId++) {
                            // ★计算好各个区块的开始索引和结束索引
                            int startIndex = threadId * blockSize; // 开始索引
                            int endIndex = (threadId + 1) * blockSize - 1; // 结束索引
                            if (threadId == (threadCount - 1)) {
                                endIndex = fileLength - 1;
                            }
                            System.out.println("区块" + threadId + ":(" + startIndex + "," + endIndex + ")");
                            // ★开启子线程下载
                            new MyDownloadThread(fileName, startIndex, endIndex, threadId).start();
                        }
                    }
                } catch (Exception e) {
                    e.printStackTrace();
                }
            }
        }.start();
    }
    // 线程下载的内部类
    static class MyDownloadThread extends Thread {
        private int endIndex;
        private int startIndex;
        private String fileName;
        private int threadId;
        public MyDownloadThread(String fileName, int startIndex, int endIndex, int threadId) {
            this.fileName = fileName;
            this.startIndex = startIndex;
            this.endIndex = endIndex;
            this.threadId = threadId;
        }
        public void run() {
            try {
                URL url = new URL(path);
                HttpURLConnection conn = (HttpURLConnection) url.openConnection();
                conn.setReadTimeout(5 * 1000);
                conn.setRequestMethod("GET");
                // ★ 设置下载的区块范围
                conn.setRequestProperty("Range", "bytes=" + startIndex + "-" + endIndex);
                int responseCode = conn.getResponseCode();
                // 部分请求成功
                if (206 == responseCode) {
                    System.out.println(threadId + "线程请求成功,准备写入" + "(" + startIndex + "," + endIndex + ")");
                    InputStream in = conn.getInputStream();
                    // 拿到写入对象
                    RandomAccessFile writeFile = new RandomAccessFile(fileName, "rw");
                    // ★ 定位写入点
                    writeFile.seek(startIndex);
                    int len = 0;
                    byte[] buffer = new byte[1024 * 1024];
                    while ((len = in.read(buffer)) != -1) {
                        writeFile.write(buffer, 0, len);
                    }
                    writeFile.close();
                    System.out.println(threadId + "写入完成");
                }
            } catch (Exception e) {
                e.printStackTrace();
            }
        };
    }
}
多线程下载与续传-玩具程序
- 如何续传?
- 其实也很简单,线程在写文件时,将已写入的大小保存起来,等程序在启动的时候读取出来就好了。
这次的程序是基于上一个多线程下载的。主要的改变集中在MyDownloadThread类中,其中重点不同的已经用★标注了。
// 线程下载的内部类
static class MyDownloadThread extends Thread {
    private int endIndex;
    private int startIndex;
    private String fileName;
    private int threadId;
    public MyDownloadThread(String fileName, int startIndex, int endIndex, int threadId) {
        this.fileName = fileName;
        this.startIndex = startIndex;
        this.endIndex = endIndex;
        this.threadId = threadId;
    }
    public void run() {
        try {
            URL url = new URL(path);
            HttpURLConnection conn = (HttpURLConnection) url.openConnection();
            conn.setReadTimeout(5 * 1000);
            conn.setRequestMethod("GET");
            // ① ★★★不同之处,读取当前线程已下载的文件进度
            int readedProgress = readProgress(threadId);
            startIndex += readedProgress;
            conn.setRequestProperty("Range", "bytes=" + startIndex + "-" + endIndex);
            int responseCode = conn.getResponseCode();
            if (206 == responseCode) {
                System.out.println(threadId + "线程请求成功,准备写入" + "(" + startIndex + "," + endIndex + ")");
                InputStream in = conn.getInputStream();
                RandomAccessFile writeFile = new RandomAccessFile(fileName, "rw");
                writeFile.seek(startIndex);
                // ② ★★★计算当前线程所负责的区块已经下载的进度
                int total = 0;
                int len = 0;
                byte[] buffer = new byte[1024 * 1024];
                while ((len = in.read(buffer)) != -1) {
                    writeFile.write(buffer, 0, len);
                    // ③ ★★★ 把当前线程已下载的文件进度写入到文件中
                    total += len;
                    writeProgress(threadId, total);
                }
                writeFile.close();
                // ④ ★★★ 删除记录的文件
                File file = new File(String.valueOf(threadId));
                if (file.exists()) {
                    file.delete();
                }
                synchronized (MultiThreadedDownload.class) {
                    runningThreadCount--;
                    if (runningThreadCount == 0) {
                        System.out.println("文件下载完成");
                    }
                }
            }
        } catch (Exception e) {
            e.printStackTrace();
        }
    }
    /** * 读取当前线程已下载的文件进度 */
    private int readProgress(int threadId) throws Exception {
        File file = new File(String.valueOf(threadId));
        if (!file.exists()) {
            return 0;
        }
        FileInputStream fis = new FileInputStream(file);
        BufferedReader br = new BufferedReader(new InputStreamReader(fis));
        String result = br.readLine();
        if (result == null || "".equals(result)) {
            return 0;
        }
        return Integer.parseInt(result);
    }
    /** * 把当前线程已下载的文件进度写入到文件中 */
    private void writeProgress(int threadId, int total) throws Exception {
        RandomAccessFile write = new RandomAccessFile(String.valueOf(threadId), "rwd");
        write.write(String.valueOf(total).getBytes());
        write.close();
    };
}
Android下多线程下载-玩具程序
经过上面的两个小示例,想做出来这样的一个界面和功能就比较容易了
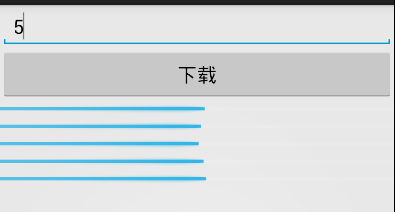
通过输入下载的线程数目,在一个LinearLayout中动态添加ProgressBar,然后开启线程,并根据区块大小和当前进度设置ProgressBar,一个简易的下载程序就出来了。
当然,这个程序只是个Demo,还有很多很多很多不完善的地方。而此Demo中的大部分代码都是直接从上面复制过来的,唯一不同的就是使用ProgressBar显示和更新进度。下面是代码
先是布局文件 activity_main.xml
<LinearLayout xmlns:android="http://schemas.android.com/apk/res/android" xmlns:tools="http://schemas.android.com/tools" android:layout_width="match_parent" android:layout_height="match_parent" android:orientation="vertical" tools:context=".MainActivity" >
    <EditText  android:id="@+id/et_thread_number" android:layout_width="match_parent" android:layout_height="wrap_content" android:hint="输入线程的个数" />
    <Button  android:layout_width="match_parent" android:layout_height="wrap_content" android:onClick="click" android:text="下载" />
    <LinearLayout  android:id="@+id/ll_layout" android:layout_width="match_parent" android:layout_height="match_parent" android:orientation="vertical" >
    </LinearLayout>
</LinearLayout>
item.xml
<?xml version="1.0" encoding="utf-8"?>
<ProgressBar xmlns:android="http://schemas.android.com/apk/res/android" android:id="@+id/progressBar1" style="?android:attr/progressBarStyleHorizontal" android:layout_width="match_parent" android:layout_height="wrap_content" />
像之前一样,我把非本节的注释全部去除了,只留下了不同的地方,并使用★作为标记
public class MainActivity extends Activity {
    private String path = "http://192.168.1.101:8080/FeiQ.exe";
    // 下载线程数
    private int threadCount = 3;
    private int runningThreadCount = 0;
    private EditText et_thread_number;
    private LinearLayout ll_layout;
    private List<ProgressBar> pbs;
    @Override
    protected void onCreate(Bundle savedInstanceState) {
        super.onCreate(savedInstanceState);
        setContentView(R.layout.activity_main);
        et_thread_number = (EditText) findViewById(R.id.et_thread_number);
        ll_layout = (LinearLayout) findViewById(R.id.ll_layout);
        pbs = new ArrayList<ProgressBar>();
    }
    public void click(View v) {
        // 获取线程数
        runningThreadCount = threadCount = Integer.parseInt(et_thread_number.getText().toString().trim());
        // ★★★ 根据线程数目动态添加Bar
        for (int i = 0; i < threadCount; i++) {
            ProgressBar child = (ProgressBar) View.inflate(getApplicationContext(), R.layout.item, null);
            ll_layout.addView(child);
            pbs.add(child);
        }
        // .... 省略 (开启线程访问网络等等)
    }
    class MyDownloadThread extends Thread {
        private int endIndex;
        private int startIndex;
        private String fileName;
        private int threadId;
        public MyDownloadThread(String fileName, int startIndex, int endIndex, int threadId) {
            this.fileName = fileName;
            this.startIndex = startIndex;
            this.endIndex = endIndex;
            this.threadId = threadId;
        }
        public void run() {
            try {
                URL url = new URL(path);
                HttpURLConnection conn = (HttpURLConnection) url.openConnection();
                conn.setReadTimeout(5 * 1000);
                conn.setRequestMethod("GET");
                int readedProgress = readProgress(threadId);
                startIndex += readedProgress;
                conn.setRequestProperty("Range", "bytes=" + startIndex + "-" + endIndex);
                int responseCode = conn.getResponseCode();
                if (206 == responseCode) {
                    System.out.println(threadId + "线程请求成功,准备写入" + "(" + startIndex + "," + endIndex + ")");
                    InputStream in = conn.getInputStream();
                    RandomAccessFile writeFile = new RandomAccessFile(Environment.getExternalStorageDirectory() + "/" + fileName, "rw");
                    writeFile.seek(startIndex);
                    // ★★★ 获取到Bar对象
                    ProgressBar bar = pbs.get(threadId);
                    // ★★★ 设置当前线程Bar的最大值
                    bar.setMax(endIndex - startIndex);
                    int total = 0;
                    int len = 0;
                    byte[] buffer = new byte[1024];
                    while ((len = in.read(buffer)) != -1) {
                        writeFile.write(buffer, 0, len);
                        total += len;
                        // ★★★ 设置当前进度
                        bar.setProgress(total);
                        writeProgress(threadId, total);
                    }
                    writeFile.close();
                    File file = new File(Environment.getExternalStorageDirectory() + "/" + String.valueOf(threadId));
                    if (file.exists()) {
                        file.delete();
                    }
                    synchronized (MyDownloadThread.class) {
                        runningThreadCount--;
                        if (runningThreadCount == 0) {
                            System.out.println("文件下载完成");
                        }
                    }
                }
            } catch (Exception e) {
                e.printStackTrace();
            }
        }
    }
}
XUtils下载文件
文件下载的原理和Demo算是写完了,但是自己写Bug很多,也不健壮。
而且作为程序员切记不要重复发明轮子,在GitHub上的开源项目XUtils就为我们提供了非常简洁的多线程下载文件的操作。
看一下下面,是不是非常的简单?
更多详细的信息,请参看这里:https://github.com/wyouflf/xUtils
HttpUtils http = new HttpUtils();
http.send(HttpRequest.HttpMethod.GET,
    "http://www.lidroid.com",
    new RequestCallBack<String>(){
        @Override
        public void onLoading(long total, long current, boolean isUploading) {
            testTextView.setText(current + "/" + total);
        }
        @Override
        public void onSuccess(ResponseInfo<String> responseInfo) {
            textView.setText(responseInfo.result);
        }
        @Override
        public void onStart() {
        }
        @Override
        public void onFailure(HttpException error, String msg) {
        }
});