1、概述
最近需要用进度条,秉着不重复造轮子的原则,上github上搜索了一番,看了几个觉得比较好看的ProgressBar,比如:daimajia的等。简单看了下代码,基本都是继承自View,彻彻底底的自定义了一个进度条。盯着那绚丽滚动条,忽然觉得,为什么要通过View去写一个滚动条,系统已经提供了ProgressBar以及属于它的特性,我们没必要重新去构建一个,但是系统的又比较丑,不同版本变现还不一定一样。那么得出我们的目标:改变系统ProgressBar的样子。
对没错,我们没有必要去从0打造一个ProgressBar,人家虽然长的不好看,但是特性以及稳定性还是刚刚的,我们只需要为其整下容就ok了。
说到整容,大家都知道我们的控件是通过onDraw()画出来的,那么我们只需要去覆盖它的onDraw()方法,自己写下就ok 。
对了,我创建了一个微信公众号,欢迎关注,左边栏目上扫一扫即可。
接下来,我们贴下效果图:
2、效果图
1、横向的进度条
2、圆形的进度条
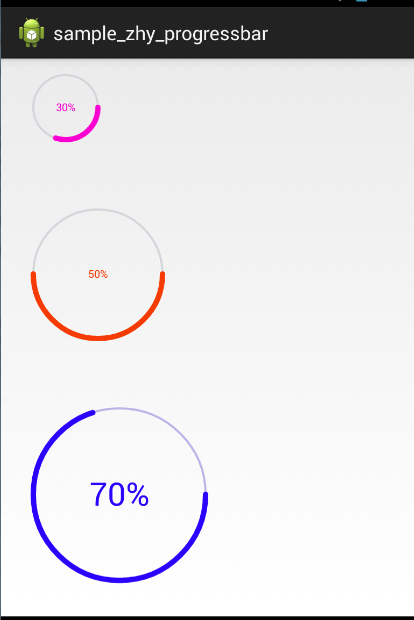
没错,这就是我们的进度条效果,横向的模仿了daimajia的进度条样子。不过我们继承子ProgressBar,简单的为其整个容,代码清晰易懂 。为什么说,易懂呢?
横向那个进度条,大家会drawLine()和drawText()吧,那么通过getWidth()拿到控件的宽度,再通过getProgress()拿到进度,按比例控制绘制线的长短,字的位置还不是分分钟的事。
github源码地址:Android-ProgressBarWidthNumber欢迎大家star or fork 。
3、实现
横向的滚动条绘制肯定需要一些属性,比如已/未到达进度的颜色、宽度,文本的颜色、大小等。
本来呢,我是想通过系统ProgressBar的progressDrawable,从里面提取一些属性完成绘制需要的参数的。但是,最终呢,反而让代码变得复杂。所以最终还是改用自定义属性。 说道自定义属性,大家应该已经不陌生了。
1、HorizontalProgressBarWithNumber
1、自定义属性
values/attr_progress_bar.xml:
<?xml version="1.0" encoding="utf-8"?>
<resources>
    <declare-styleable name="HorizontalProgressBarWithNumber">
        <attr name="progress_unreached_color" format="color" />
        <attr name="progress_reached_color" format="color" />
        <attr name="progress_reached_bar_height" format="dimension" />
        <attr name="progress_unreached_bar_height" format="dimension" />
        <attr name="progress_text_size" format="dimension" />
        <attr name="progress_text_color" format="color" />
        <attr name="progress_text_offset" format="dimension" />
        <attr name="progress_text_visibility" format="enum">
            <enum name="visible" value="0" />
            <enum name="invisible" value="1" />
        </attr>
    </declare-styleable>
    <declare-styleable name="RoundProgressBarWidthNumber">
        <attr name="radius" format="dimension" />
    </declare-styleable>
</resources>
2、构造中获取
public class HorizontalProgressBarWithNumber extends ProgressBar
{
	private static final int DEFAULT_TEXT_SIZE = 10;
	private static final int DEFAULT_TEXT_COLOR = 0XFFFC00D1;
	private static final int DEFAULT_COLOR_UNREACHED_COLOR = 0xFFd3d6da;
	private static final int DEFAULT_HEIGHT_REACHED_PROGRESS_BAR = 2;
	private static final int DEFAULT_HEIGHT_UNREACHED_PROGRESS_BAR = 2;
	private static final int DEFAULT_SIZE_TEXT_OFFSET = 10;
	/**
	 * painter of all drawing things
	 */
	protected Paint mPaint = new Paint();
	/**
	 * color of progress number
	 */
	protected int mTextColor = DEFAULT_TEXT_COLOR;
	/**
	 * size of text (sp)
	 */
	protected int mTextSize = sp2px(DEFAULT_TEXT_SIZE);
	/**
	 * offset of draw progress
	 */
	protected int mTextOffset = dp2px(DEFAULT_SIZE_TEXT_OFFSET);
	/**
	 * height of reached progress bar
	 */
	protected int mReachedProgressBarHeight = dp2px(DEFAULT_HEIGHT_REACHED_PROGRESS_BAR);
	/**
	 * color of reached bar
	 */
	protected int mReachedBarColor = DEFAULT_TEXT_COLOR;
	/**
	 * color of unreached bar
	 */
	protected int mUnReachedBarColor = DEFAULT_COLOR_UNREACHED_COLOR;
	/**
	 * height of unreached progress bar
	 */
	protected int mUnReachedProgressBarHeight = dp2px(DEFAULT_HEIGHT_UNREACHED_PROGRESS_BAR);
	/**
	 * view width except padding
	 */
	protected int mRealWidth;
	protected boolean mIfDrawText = true;
	protected static final int VISIBLE = 0;
	public HorizontalProgressBarWithNumber(Context context, AttributeSet attrs)
	{
		this(context, attrs, 0);
	}
	public HorizontalProgressBarWithNumber(Context context, AttributeSet attrs,
			int defStyle)
	{
		super(context, attrs, defStyle);
		setHorizontalScrollBarEnabled(true);
		obtainStyledAttributes(attrs);
		mPaint.setTextSize(mTextSize);
		mPaint.setColor(mTextColor);
	}
	/**
	 * get the styled attributes
	 *
	 * @param attrs
	 */
	private void obtainStyledAttributes(AttributeSet attrs)
	{
		// init values from custom attributes
		final TypedArray attributes = getContext().obtainStyledAttributes(
				attrs, R.styleable.HorizontalProgressBarWithNumber);
		mTextColor = attributes
				.getColor(
						R.styleable.HorizontalProgressBarWithNumber_progress_text_color,
						DEFAULT_TEXT_COLOR);
		mTextSize = (int) attributes.getDimension(
				R.styleable.HorizontalProgressBarWithNumber_progress_text_size,
				mTextSize);
		mReachedBarColor = attributes
				.getColor(
						R.styleable.HorizontalProgressBarWithNumber_progress_reached_color,
						mTextColor);
		mUnReachedBarColor = attributes
				.getColor(
						R.styleable.HorizontalProgressBarWithNumber_progress_unreached_color,
						DEFAULT_COLOR_UNREACHED_COLOR);
		mReachedProgressBarHeight = (int) attributes
				.getDimension(
						R.styleable.HorizontalProgressBarWithNumber_progress_reached_bar_height,
						mReachedProgressBarHeight);
		mUnReachedProgressBarHeight = (int) attributes
				.getDimension(
						R.styleable.HorizontalProgressBarWithNumber_progress_unreached_bar_height,
						mUnReachedProgressBarHeight);
		mTextOffset = (int) attributes
				.getDimension(
						R.styleable.HorizontalProgressBarWithNumber_progress_text_offset,
						mTextOffset);
		int textVisible = attributes
				.getInt(R.styleable.HorizontalProgressBarWithNumber_progress_text_visibility,
						VISIBLE);
		if (textVisible != VISIBLE)
		{
			mIfDrawText = false;
		}
		attributes.recycle();
	}
嗯,看起来代码挺长,其实都是在获取自定义属性,没什么技术含量。
3、onMeasure
刚才不是出onDraw里面写写就行了么,为什么要改onMeasure呢,主要是因为我们所有的属性比如进度条宽度让用户自定义了,所以我们的测量也得稍微变下。
@Override
	protected synchronized void onMeasure(int widthMeasureSpec,
			int heightMeasureSpec)
	{
		int heightMode = MeasureSpec.getMode(heightMeasureSpec);
		if (heightMode != MeasureSpec.EXACTLY)
		{
			float textHeight = (mPaint.descent() + mPaint.ascent());
			int exceptHeight = (int) (getPaddingTop() + getPaddingBottom() + Math
					.max(Math.max(mReachedProgressBarHeight,
							mUnReachedProgressBarHeight), Math.abs(textHeight)));
			heightMeasureSpec = MeasureSpec.makeMeasureSpec(exceptHeight,
					MeasureSpec.EXACTLY);
		}
		super.onMeasure(widthMeasureSpec, heightMeasureSpec);
	}
宽度我们不变,所以的自定义属性不涉及宽度,高度呢,只考虑不是EXACTLY的情况(用户明确指定了,我们就不管了),根据padding和进度条宽度算出自己想要的,如果非EXACTLY下,我们进行exceptHeight封装,传入给控件进行测量高度。
测量完,就到我们的onDraw了~~~
4、onDraw
@Override
	protected synchronized void onDraw(Canvas canvas)
	{
		canvas.save();
		//画笔平移到指定paddingLeft, getHeight() / 2位置,注意以后坐标都为以此为0,0
		canvas.translate(getPaddingLeft(), getHeight() / 2);
		boolean noNeedBg = false;
		//当前进度和总值的比例
		float radio = getProgress() * 1.0f / getMax();
		//已到达的宽度
		float progressPosX = (int) (mRealWidth * radio);
		//绘制的文本
		String text = getProgress() + "%";
		//拿到字体的宽度和高度
		float textWidth = mPaint.measureText(text);
		float textHeight = (mPaint.descent() + mPaint.ascent()) / 2;
		//如果到达最后,则未到达的进度条不需要绘制
		if (progressPosX + textWidth > mRealWidth)
		{
			progressPosX = mRealWidth - textWidth;
			noNeedBg = true;
		}
		// 绘制已到达的进度
		float endX = progressPosX - mTextOffset / 2;
		if (endX > 0)
		{
			mPaint.setColor(mReachedBarColor);
			mPaint.setStrokeWidth(mReachedProgressBarHeight);
			canvas.drawLine(0, 0, endX, 0, mPaint);
		}
		// 绘制文本
		if (mIfDrawText)
		{
			mPaint.setColor(mTextColor);
			canvas.drawText(text, progressPosX, -textHeight, mPaint);
		}
		// 绘制未到达的进度条
		if (!noNeedBg)
		{
			float start = progressPosX + mTextOffset / 2 + textWidth;
			mPaint.setColor(mUnReachedBarColor);
			mPaint.setStrokeWidth(mUnReachedProgressBarHeight);
			canvas.drawLine(start, 0, mRealWidth, 0, mPaint);
		}
		canvas.restore();
	}
	@Override
	protected void onSizeChanged(int w, int h, int oldw, int oldh)
	{
		super.onSizeChanged(w, h, oldw, oldh);
		mRealWidth = w - getPaddingRight() - getPaddingLeft();
	}
其实核心方法就是onDraw了,但是呢,onDraw也很简单,绘制线、绘制文本、绘制线,结束。
还有两个简单的辅助方法:
/**
	 * dp 2 px
	 *
	 * @param dpVal
	 */
	protected int dp2px(int dpVal)
	{
		return (int) TypedValue.applyDimension(TypedValue.COMPLEX_UNIT_DIP,
				dpVal, getResources().getDisplayMetrics());
	}
	/**
	 * sp 2 px
	 *
	 * @param spVal
	 * @return
	 */
	protected int sp2px(int spVal)
	{
		return (int) TypedValue.applyDimension(TypedValue.COMPLEX_UNIT_SP,
				spVal, getResources().getDisplayMetrics());
	}
好了,到此我们的横向进度就结束了,是不是很简单~~如果你是自定义View,你还得考虑progress的更新,考虑状态的销毁与恢复等等复杂的东西。
接下来看我们的RoundProgressBarWidthNumber圆形的进度条。
2、RoundProgressBarWidthNumber
圆形的进度条和横向的进度条基本变量都是一致的,于是我就让RoundProgressBarWidthNumber extends HorizontalProgressBarWithNumber 了。
然后需要改变的就是测量和onDraw了:
完整代码:
package com.zhy.view;
import android.content.Context;
import android.content.res.TypedArray;
import android.graphics.Canvas;
import android.graphics.Paint.Cap;
import android.graphics.Paint.Style;
import android.graphics.RectF;
import android.util.AttributeSet;
import com.zhy.library.view.R;
public class RoundProgressBarWidthNumber extends
		HorizontalProgressBarWithNumber {
	/**
	 * mRadius of view
	 */
	private int mRadius = dp2px(30);
	public RoundProgressBarWidthNumber(Context context) {
		this(context, null);
	}
	public RoundProgressBarWidthNumber(Context context, AttributeSet attrs) {
		super(context, attrs);
		mReachedProgressBarHeight = (int) (mUnReachedProgressBarHeight * 2.5f);
		TypedArray ta = context.obtainStyledAttributes(attrs,
				R.styleable.RoundProgressBarWidthNumber);
		mRadius = (int) ta.getDimension(
				R.styleable.RoundProgressBarWidthNumber_radius, mRadius);
		ta.recycle();
		mTextSize = sp2px(14);
		mPaint.setStyle(Style.STROKE);
		mPaint.setAntiAlias(true);
		mPaint.setDither(true);
		mPaint.setStrokeCap(Cap.ROUND);
	}
	@Override
	protected synchronized void onMeasure(int widthMeasureSpec,
			int heightMeasureSpec) {
		int heightMode = MeasureSpec.getMode(heightMeasureSpec);
		int widthMode = MeasureSpec.getMode(widthMeasureSpec);
		int paintWidth = Math.max(mReachedProgressBarHeight,
				mUnReachedProgressBarHeight);
		if (heightMode != MeasureSpec.EXACTLY) {
			int exceptHeight = (int) (getPaddingTop() + getPaddingBottom()
					+ mRadius * 2 + paintWidth);
			heightMeasureSpec = MeasureSpec.makeMeasureSpec(exceptHeight,
					MeasureSpec.EXACTLY);
		}
		if (widthMode != MeasureSpec.EXACTLY) {
			int exceptWidth = (int) (getPaddingLeft() + getPaddingRight()
					+ mRadius * 2 + paintWidth);
			widthMeasureSpec = MeasureSpec.makeMeasureSpec(exceptWidth,
					MeasureSpec.EXACTLY);
		}
		super.onMeasure(heightMeasureSpec, heightMeasureSpec);
	}
	@Override
	protected synchronized void onDraw(Canvas canvas) {
		String text = getProgress() + "%";
		// mPaint.getTextBounds(text, 0, text.length(), mTextBound);
		float textWidth = mPaint.measureText(text);
		float textHeight = (mPaint.descent() + mPaint.ascent()) / 2;
		canvas.save();
		canvas.translate(getPaddingLeft(), getPaddingTop());
		mPaint.setStyle(Style.STROKE);
		// draw unreaded bar
		mPaint.setColor(mUnReachedBarColor);
		mPaint.setStrokeWidth(mUnReachedProgressBarHeight);
		canvas.drawCircle(mRadius, mRadius, mRadius, mPaint);
		// draw reached bar
		mPaint.setColor(mReachedBarColor);
		mPaint.setStrokeWidth(mReachedProgressBarHeight);
		float sweepAngle = getProgress() * 1.0f / getMax() * 360;
		canvas.drawArc(new RectF(0, 0, mRadius * 2, mRadius * 2), 0,
				sweepAngle, false, mPaint);
		// draw text
		mPaint.setStyle(Style.FILL);
		canvas.drawText(text, mRadius - textWidth / 2, mRadius - textHeight,
				mPaint);
		canvas.restore();
	}
}
首先获取它的专有属性mRadius,然后根据此属性去测量,测量完成绘制;
绘制的过程呢?
先绘制一个细一点的圆,然后绘制一个粗一点的弧度,二者叠在一起就行。文本呢,绘制在中间~~~总体,没什么代码量。
好了,两个进度条就到这了,是不是发现简单很多。总体设计上,存在些问题,如果抽取一个BaseProgressBar用于获取公共的属性;然后不同样子的进度条继承分别实现自己的测量和样子,这样结构可能会清晰些~~~
4、使用
布局文件
<ScrollView xmlns:android="http://schemas.android.com/apk/res/android"
    xmlns:tools="http://schemas.android.com/tools"
    xmlns:zhy="http://schemas.android.com/apk/res-auto"
    android:layout_width="match_parent"
    android:layout_height="match_parent" >
    <LinearLayout
        android:layout_width="match_parent"
        android:layout_height="match_parent"
        android:orientation="vertical"
        android:padding="25dp" >
        <com.zhy.view.HorizontalProgressBarWithNumber
            android:id="@+id/id_progressbar01"
            android:layout_width="match_parent"
            android:layout_height="wrap_content"
            android:layout_marginTop="50dip"
            android:padding="5dp" />
        <com.zhy.view.HorizontalProgressBarWithNumber
            android:layout_width="match_parent"
            android:layout_height="wrap_content"
            android:layout_marginTop="50dip"
            android:padding="5dp"
            android:progress="50"
            zhy:progress_text_color="#ffF53B03"
            zhy:progress_unreached_color="#ffF7C6B7" />
        <com.zhy.view.RoundProgressBarWidthNumber
            android:id="@+id/id_progress02"
            android:layout_width="match_parent"
            android:layout_height="wrap_content"
            android:layout_marginTop="50dip"
            android:padding="5dp"
            android:progress="30" />
        <com.zhy.view.RoundProgressBarWidthNumber
            android:layout_width="match_parent"
            android:layout_height="wrap_content"
            android:layout_marginTop="50dip"
            android:padding="5dp"
            android:progress="50"
            zhy:progress_reached_bar_height="20dp"
            zhy:progress_text_color="#ffF53B03"
            zhy:radius="60dp" />
    </LinearLayout>
</ScrollView>
MainActivity
package com.zhy.sample.progressbar;
import android.app.Activity;
import android.os.Bundle;
import android.os.Handler;
import com.zhy.annotation.Log;
import com.zhy.view.HorizontalProgressBarWithNumber;
public class MainActivity extends Activity {
	private HorizontalProgressBarWithNumber mProgressBar;
	private static final int MSG_PROGRESS_UPDATE = 0x110;
	private Handler mHandler = new Handler() {
		@Log
		public void handleMessage(android.os.Message msg) {
			int progress = mProgressBar.getProgress();
			mProgressBar.setProgress(++progress);
			if (progress >= 100) {
				mHandler.removeMessages(MSG_PROGRESS_UPDATE);
			}
			mHandler.sendEmptyMessageDelayed(MSG_PROGRESS_UPDATE, 100);
		};
	};
	@Log
	@Override
	protected void onCreate(Bundle savedInstanceState) {
		super.onCreate(savedInstanceState);
		setContentView(R.layout.activity_main);
		mProgressBar = (HorizontalProgressBarWithNumber) findViewById(R.id.id_progressbar01);
		mHandler.sendEmptyMessage(MSG_PROGRESS_UPDATE);
	}
}
最后,本篇博客的目的呢?就是为了说下,类似ProgressBar这样的控件,如果你只是想去改变显示的样子,完全没必要从0去创建,复写onDraw即可,当然是个人观点,提出供大家参考。