在Web开发中,Session表示HTTP服务器与客户端(例如浏览器)的“会话”,每个客户端会有其对应的Session保存在服务器端,通常用来保存和客户端关联的一些信息,例如是否登录、购物车等。
Session一般情况下是保存在服务器内存中。如果服务器重启,Session就会丢失。另外,如果是集群环境,Web应用部署在多台服务器上,Session如果保存在各自的服务器上,就无法共享了。
针对这个问题,Jetty服务器提供了用于集群环境下的Session实现方式,即通过多台Jetty服务器连接到同一个Session数据库来实现Session共享。
1、配置Session存储到关系数据库(MySQL为例):
配置jetty.xml:
打开Jetty目录下的etc/jetty.xml,在Configure元素内部加入XML片段:
<Set name="sessionIdManager">
<New id="jdbcidmgr" class="org.eclipse.jetty.server.session.JDBCSessionIdManager">
<Arg>
<Ref id="Server" />
</Arg>
<Set name="workerName">fred</Set>
<Call name="setDriverInfo">
<Arg>com.mysql.jdbc.Driver</Arg>
<Arg>jdbc:mysql://192.168.20.1:3306/jetty_session?user=root&password=123</Arg>
</Call>
<Set name="scavengeInterval">60</Set>
</New>
</Set>
<Call name="setAttribute">
<Arg>jdbcIdMgr</Arg>
<Arg>
<Ref id="jdbcidmgr" />
</Arg>
</Call>
修改上面XML片段中的数据库连接的URL,如果用其他关系数据库,还要修改数据库驱动。要注意在XML中&符号要转义成&。
配置context xml:
在Jetty的webapps目录下,新建一个XML文件,例如test.xml,这个XML用于配置一个web应用:
<?xml version="1.0" encoding="UTF-8"?>
<!DOCTYPE Configure PUBLIC "-//Jetty//Configure//EN" "http://www.eclipse.org/jetty/configure_9_0.dtd">
<Configure class="org.eclipse.jetty.webapp.WebAppContext">
    <Set name="contextPath">/test</Set>
    <Set name="war">D:\test.war</Set>
    <Ref name="Server" id="Server">
        <Call id="jdbcIdMgr" name="getAttribute">
            <Arg>jdbcIdMgr</Arg>
        </Call>
    </Ref>
    <Set name="sessionHandler">
        <New class="org.eclipse.jetty.server.session.SessionHandler">
            <Arg>
                <New id="jdbcmgr" class="org.eclipse.jetty.server.session.JDBCSessionManager">
                    <Set name="sessionIdManager">
                        <Ref id="jdbcIdMgr" />
                    </Set>
                </New>
            </Arg>
        </New>
    </Set>
</Configure>
其中,<Set name="war">D:\test.war</Set>配置web应用的war包,<Set name="contextPath">/test</Set>配置web应用的contextPath,例如http://localhost:8080/test。
启动Jetty测试:
在启动Jetty之前,还需要把MySQL驱动jar包放在Jetty的lib/ext目录下。此外,还要创建好数据库,准备好war包。
一切就绪以后,就可以启动Jetty服务器测试Session是否已经保存在数据库中。
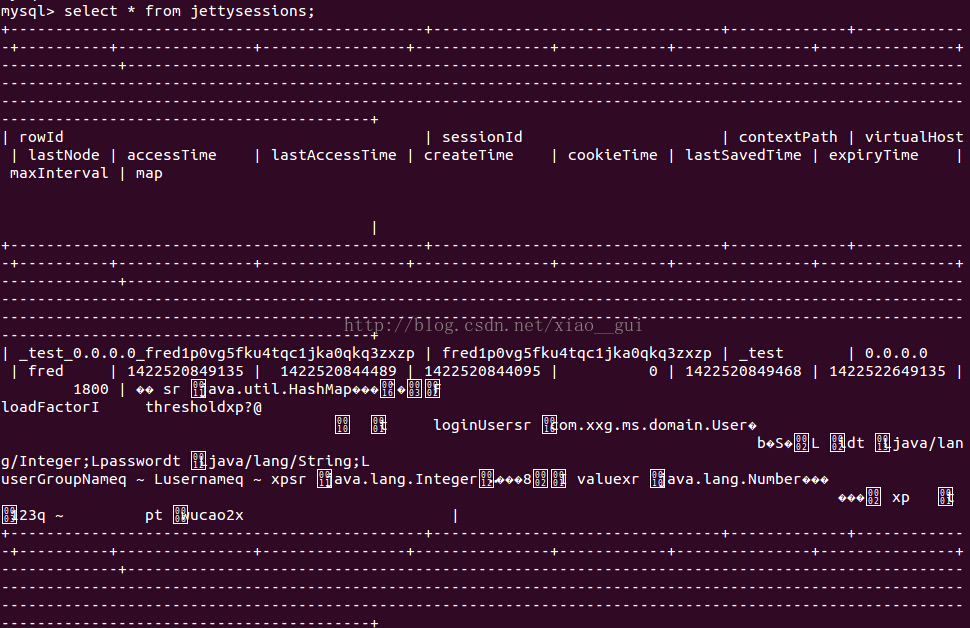
通过java -jar start.jar命令启动Jetty服务器,打开浏览器访问页面。可以看到在数据库中会生成两个表:jettysessionids、jettysessions,分别用于存储session id和session的信息。如果重启Jetty服务器,由于Session已经持久化到数据库中,所以Session不会丢失。
需要注意的是,由于Session保存的是Java对象,会通过Java的序列化写入数据库,也就是Session中的对象必须支持序列化和反序列化,即实现Serializable接口。
配置文件说明:
如果看不懂上面两段XML配置的话,这里做一个简单的说明。
上面的这些XML实际上是Jetty的IOC配置文件,说到IOC首先会想到Spring框架,实际上Jetty的IOC和Spring的IOC解决的问题是类似的,只是XML的格式有些区别。
Jetty的IOC配置也很好理解,例如<Set name="contextPath">/test</Set>即调用setContextPath("/test"),<Call name="getAttribute"><Arg>jdbcIdMgr</Arg></Call>即调用getAttribute("jdbcIdMgr"),<New class="org.eclipse.jetty.server.session.SessionHandler"></New>即为Java实例化对象new SessionHandler()。
将上面的两段XML“翻译”成Java代码:
import org.eclipse.jetty.server.Server;
import org.eclipse.jetty.server.session.JDBCSessionIdManager;
import org.eclipse.jetty.server.session.JDBCSessionManager;
import org.eclipse.jetty.server.session.SessionHandler;
import org.eclipse.jetty.webapp.WebAppContext;
public class Main {
    public static void main(String[] args) throws Exception {
        Server server = new Server(8080);
        // 以下对应jetty.xml的配置
        JDBCSessionIdManager sessionIdManager = new JDBCSessionIdManager(server);
        sessionIdManager.setWorkerName("fred");
        sessionIdManager.setDriverInfo("com.mysql.jdbc.Driver",
                "jdbc:mysql://192.168.20.1:3306/jetty_session?user=root&password=123");
        sessionIdManager.setScavengeInterval(60);
        server.setAttribute("jdbcIdMgr", sessionIdManager);
        // 以下对应context xml的配置
        WebAppContext webapp = new WebAppContext();
        webapp.setContextPath("/test");
        webapp.setWar("D:\\test.war");
        JDBCSessionIdManager jdbcIdMgr = (JDBCSessionIdManager) server.getAttribute("jdbcIdMgr");
        JDBCSessionManager sessionManager = new JDBCSessionManager();
        sessionManager.setSessionIdManager(jdbcIdMgr);
        SessionHandler sessionHandler = new SessionHandler(sessionManager);
        webapp.setSessionHandler(sessionHandler);
        // 启动服务器
        server.setHandler(webapp);
        server.start();
        server.join();
    }
}
运行Java代码,同样可以启动服务器,将Session存入数据库,实现同样的效果。
2、配置Session存储到MongoDB
配置jetty.xml:
打开etc/jetty.xml,在Configure元素内部加入XML片段:
<New id="mongodb" class="com.mongodb.MongoClient">
    <Arg type="java.lang.String">192.168.20.1</Arg>
    <Arg type="int">27017</Arg>
    <Call name="getDB">
        <Arg>jetty_session</Arg>
        <Call id="sessionDocument" name="getCollection">
            <Arg>jetty_session_collection</Arg>
        </Call>
    </Call>
</New>
<Set name="sessionIdManager">
    <New id="mongoIdMgr" class="org.eclipse.jetty.nosql.mongodb.MongoSessionIdManager">
        <Arg>
            <Ref id="Server" />
        </Arg>
        <Arg>
            <Ref id="sessionDocument" />
        </Arg>
        <Set name="workerName">fred</Set>
        <Set name="scavengePeriod">60</Set>
    </New>
</Set>
<Call name="setAttribute">
    <Arg>mongoIdMgr</Arg>
    <Arg>
        <Ref id="mongoIdMgr" />
    </Arg>
</Call>
修改上面XML片段中的MongoDB的IP、端口号、数据库名、Collection名。
配置context xml:
在Jetty的webapps目录下,新建一个XML文件,例如test.xml,这个XML用于配置一个web应用:
<?xml version="1.0" encoding="UTF-8"?>
<!DOCTYPE Configure PUBLIC "-//Jetty//Configure//EN" "http://www.eclipse.org/jetty/configure_9_0.dtd">
<Configure class="org.eclipse.jetty.webapp.WebAppContext">
  <Set name="contextPath">/test</Set>
  <Set name="war">D:\test.war</Set>
  <Ref name="Server" id="Server">
    <Call id="mongoIdMgr" name="getSessionIdManager"/>
  </Ref>
  <Set name="sessionHandler">
    <New class="org.eclipse.jetty.server.session.SessionHandler">
      <Arg>
        <New id="mongoMgr" class="org.eclipse.jetty.nosql.mongodb.MongoSessionManager">
          <Set name="sessionIdManager">
            <Ref id="mongoIdMgr"/>
          </Set>
        </New>
      </Arg>
    </New>
  </Set>
</Configure>
启动Jetty测试:
测试前,首先要吧两个jar包放在Jetty的lib/ext目录下,一个是MongoDB的驱动包,另一个是jetty-nosql的jar包,在http://repo1.maven.org/maven2/org/eclipse/jetty/jetty-nosql/下载对应版本的jar包。此外,在MongoDB中创建好对应的数据库。
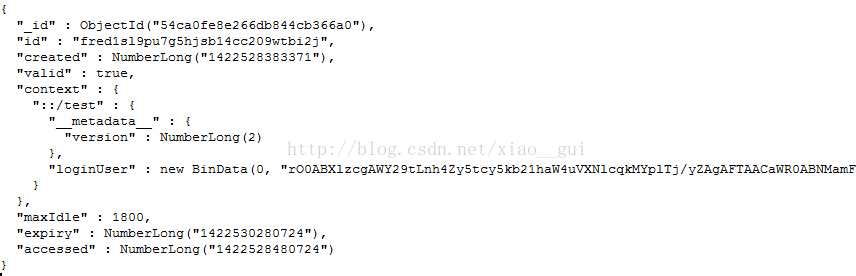
通过java -jar start.jar命令启动Jetty服务器,打开浏览器打开页面。可以看到在MongoDB中创建了配置的Collection并插入了数据:
“翻译”成Java代码:
将上面的两段Jetty的IOC配置文件转成Java代码,直接运行可以实现同样的功能:
import org.eclipse.jetty.nosql.mongodb.MongoSessionIdManager;
import org.eclipse.jetty.nosql.mongodb.MongoSessionManager;
import org.eclipse.jetty.server.Server;
import org.eclipse.jetty.server.session.SessionHandler;
import org.eclipse.jetty.webapp.WebAppContext;
import com.mongodb.DB;
import com.mongodb.DBCollection;
import com.mongodb.MongoClient;
public class Main {
    public static void main(String[] args) throws Exception {
        Server server = new Server(8080);
        // 以下对应jetty.xml的配置
        MongoClient mongoClient = new MongoClient("192.168.20.1", 27017);
        DB db = mongoClient.getDB("jetty_session");
        DBCollection collection = db.getCollection("jetty_session_collection");
        MongoSessionIdManager sessionIdManager = new MongoSessionIdManager(server, collection);
        sessionIdManager.setWorkerName("fred");
        sessionIdManager.setScavengePeriod(60);
        server.setAttribute("mongoIdMgr", sessionIdManager);
        // 以下对应context xml的配置
        WebAppContext webapp = new WebAppContext();
        webapp.setContextPath("/test");
        webapp.setWar("D:\\test.war");
        MongoSessionIdManager mongoIdMgr = (MongoSessionIdManager) server.getAttribute("mongoIdMgr");
        MongoSessionManager sessionManager = new MongoSessionManager();
        sessionManager.setSessionIdManager(mongoIdMgr);
        SessionHandler sessionHandler = new SessionHandler(sessionManager);
        webapp.setSessionHandler(sessionHandler);
        // 启动服务器
        server.setHandler(webapp);
        server.start();
        server.join();
    }
}