在开发Silverlight或者WPF项目时,当我们调用Web服务来加载一些数据时,由于数据量比较大需要较长的时间,需要用户等待,为了给用户友好的提示和避免用户在加载数据过程中进行重复操作,我们通常使用BusyIndicator这个控件来锁定当前页面。然而,有时候BusyIndicator这个控件的风格和我们的界面风格并不搭配,而且修改起来也比较麻烦,今天我们就来自己写一个BusyIndicator控件,实现自定义的忙碌提示。
后面会提供源码下载。
我们先来看下面这段代码,如图:
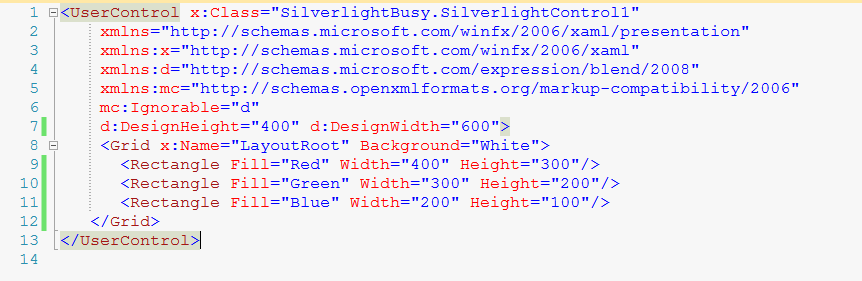
我们添加了三个矩形在Grid中,我们设置了矩形的宽度和高度,那么矩形会怎么显示呢?从上到下顺序显示吗?NO!不是这样的,我们来看看显示结果:
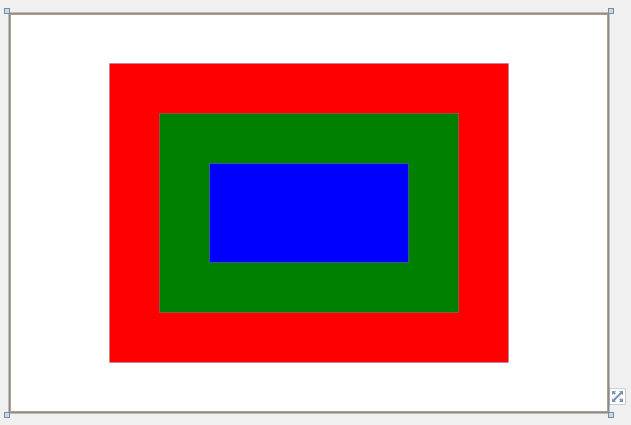
三个矩形层叠在了一起,按照代码的顺序,依次从下往上显示,代码中放在最后的矩形显示在最顶层。这是Grid的一个特性,当然在Canvas中也可以层叠显示,不过不是居中显示,是右上脚对齐显示的。如果是StackPanel则是从上到下一次显示。
根据这个特性,我们知道在Grid中后添加的UI元素会显示在其他元素的最顶层,所以我们可以在运行时通过代码来动态的向Grid中添加元素,并且这个元素处于最顶层,从而可以遮挡其他页面元素。
下面我们来看看最终的实现效果:

是不是有一种中国风的味道啊!下面我们来详细说明实现方法。
这里我是用Silverlight来演示,用WPF也是一样的。首先新建项目,添加一个Silverlight user Control,这里我起的名字就叫Load,页面XAML代码如下:
<UserControl x:Class="SilverlightBusy.Load"
    xmlns="http://schemas.microsoft.com/winfx/2006/xaml/presentation"
    xmlns:x="http://schemas.microsoft.com/winfx/2006/xaml"
    xmlns:d="http://schemas.microsoft.com/expression/blend/2008"
    xmlns:mc="http://schemas.openxmlformats.org/markup-compatibility/2006"
    xmlns:ed="http://schemas.microsoft.com/expression/2010/drawing"
    mc:Ignorable="d" d:DesignHeight="300" d:DesignWidth="400">
   <UserControl.Resources>
      <Storyboard x:Name="fadeStoryboard">
         <DoubleAnimation x:Name="fadeAnimation" BeginTime="00:00:00" Storyboard.TargetName="LayoutRoot" Storyboard.TargetProperty="Opacity" From="0.9" To="0" Duration="0:0:01">
         </DoubleAnimation>
      </Storyboard>
   </UserControl.Resources>
    <Grid x:Name="LayoutRoot" Background="#cccccc" Opacity="0.9">
      <Grid.Resources>
         <Storyboard x:Name="fadeImgStoryboard">
            <DoubleAnimation x:Name="fadeImgAnimation" BeginTime="00:00:00" Storyboard.TargetName="LoadImg" Storyboard.TargetProperty="Opacity" From="1" To="0" Duration="0:0:01">
            </DoubleAnimation>
         </Storyboard>
      </Grid.Resources>
      <Image x:Name="LoadImg" Source="/SilverlightBusy;component/Images/Loading.png" Width="128" Height="128">
      </Image>
      <TextBlock x:Name="txtLoading" Width="60" VerticalAlignment="Center" HorizontalAlignment="Center" Text="Loading..."/>
   </Grid>
</UserControl>
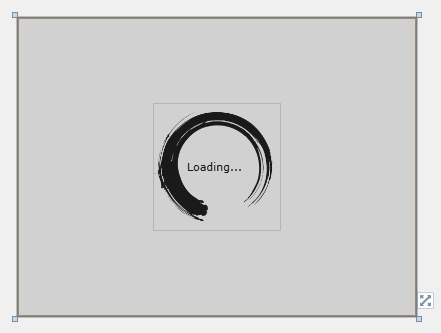
其实这个页面很简单,就是一个Grid、一个Image和一个TextBlock,添加两个Storyboard是为了有个过渡效果,这样看起来更加平滑一下,直接隐藏掉Image和TextBlock的话,会让人感觉闪一下。其设计视图如图:
其后台代码如下:
public partial class Load : UserControl
   {
      private int _counter = 0;
      private DispatcherTimer timer = new DispatcherTimer();
      private RotateTransform rt = new RotateTransform();
      private bool _isBusy = false;
      public bool IsBusy
      {
         get
         {
            return _isBusy;
         }
         set
         {
            _isBusy = value;
            if (value)
            {
               this.LayoutRoot.Visibility = Visibility.Visible;
               this.LayoutRoot.Opacity = 0.9;
               timer.Start();
            }
            else
            {
               //首先隐藏图片,图片隐藏后隐藏掉透明的背景层。
               fadeImgStoryboard.Begin();
               fadeImgStoryboard.Completed += (sender, e) =>
               {
                  txtLoading.Visibility = Visibility.Collapsed;
                  fadeStoryboard.Begin();
               };
               fadeStoryboard.Completed += (sender, e) =>
               {
                  timer.Stop();
                  this.LayoutRoot.Visibility = Visibility.Collapsed;
               };
            }
         }
      }
      public Load()
      {
         InitializeComponent();
         timer.Interval = new TimeSpan(200000);
         timer.Tick += new EventHandler(timer_Tick);
         timer.Start();
      }
      void timer_Tick(object sender, EventArgs e)
      {
         _counter++;
         //设置旋转中心点,根据图片大小设置,值为图片尺寸/2.
         rt.CenterX = 64;
         rt.CenterY = 64;
         rt.Angle -= 10; //旋转图片,每次旋转10度,可自定义旋转方向
         LoadImg.RenderTransform = rt;
         //让Loading后面的点闪的不要太快
         if (_counter % 8 == 0)
         {
            if (txtLoading.Text.Equals("Loading..."))
            {
               txtLoading.Text = "Loading.";
            }
            else if (txtLoading.Text.Equals("Loading."))
            {
               txtLoading.Text = "Loading..";
            }
            else if (txtLoading.Text.Equals("Loading.."))
            {
               txtLoading.Text = "Loading...";
            }
         }
      }
   }
后台代码主要控制图片旋转动画和问题动画,还有就是数据加载完毕时,隐藏页面元素。
在MainPage中添加一个按钮,添加click事件,代码如下:
public partial class MainPage : UserControl
   {
      private Load load = null;
      public MainPage()
      {
         InitializeComponent();
      }
      private void button1_Click(object sender, RoutedEventArgs e)
      {
         load = new Load();
         LayoutRoot.Children.Add(load);//将Load添加到页面,会显示在最顶层
         load.IsBusy = true;
         //在线程中调用,否则会造成UI线程阻塞。
         new System.Threading.Thread(() =>
         {
            for (int i = 0; i < 10; i++)
            {
               System.Threading.Thread.Sleep(500);
            }
            this.Dispatcher.BeginInvoke(() =>
            {
               load.IsBusy = false;
            });
         }).Start();
      }
   }
添加完成后按F5执行,我们在打开的页面中单击按钮,就可以看到效果了。
当然,这里只是实现了和BusyIndicator一样的效果,如果想像使用BusyIndicator那样的话,我们还要进一步的进行封装。