一、引子 学过Android的同学都知道,对话框的重要程度非常高,任何一款 app几乎都离不开对话框,值得庆幸的是,对话框的运用在Android中还是相对比较容易的。虽然很简单,但我在项目中还是碰到些问题,比如,如何实现自定义的对话框NegativeButton的点击效果、如何改变标题的字体大小和颜色等。
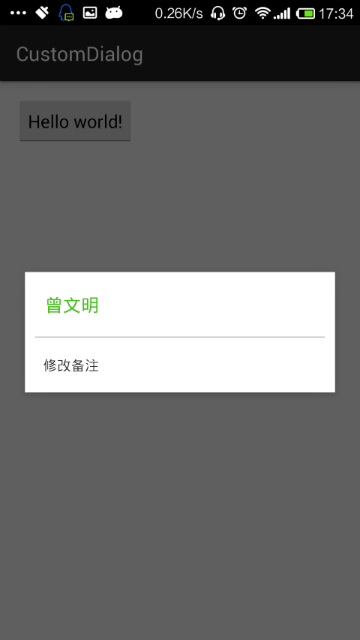
二、分析和实现 下面来看一下下面那张效果图,微信长按通讯录时弹出的对话框。 
1、wechat_dialog.xml
<?xml version="1.0" encoding="utf-8"?>
<LinearLayout xmlns:android="http://schemas.android.com/apk/res/android" android:orientation="vertical" android:layout_width="match_parent" android:layout_height="match_parent" android:background="@color/white">
    <TextView  android:id="@+id/id_name" android:layout_width="wrap_content" android:layout_height="wrap_content" android:textSize="18sp" android:text="曾文明" android:textColor="@color/bigColor" android:padding="20dp"/>
    <View  android:layout_width="match_parent" android:layout_height="1dp" android:background="@color/lineColor" android:layout_marginLeft="10dp" android:layout_marginRight="10dp" />
    <TextView  android:layout_width="wrap_content" android:layout_height="wrap_content" android:text="修改备注" android:padding="18dp" android:textSize="14sp" android:textColor="@color/txtColor"/>
</LinearLayout>
在MainActivity中调用
public static void showWeChatTitleDialog(Context context){
        AlertDialog.Builder dialogBuilder = new AlertDialog.Builder(context) ;
        dialogBuilder.create() ;
        LayoutInflater inflater = LayoutInflater.from(context) ;
        View view = inflater.inflate(R.layout.wechat_dialog, null) ;
       dialogBuilder.setView(view) ;
       dialogBuilder.show() ;
}
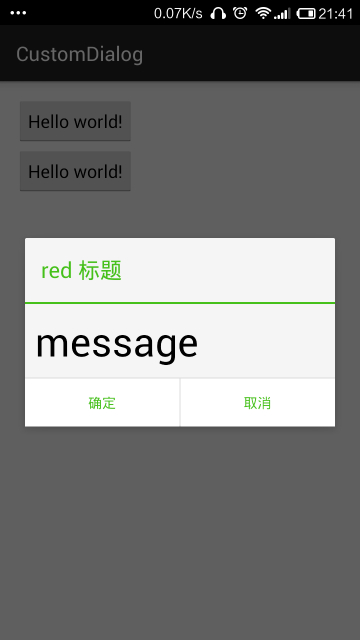
运行效果就是上图的效果。到这里为止,不能说明任何问题,最多只能说明AlertDialog使用起来并不复杂,接下来才是重点;还是先来看一张效果图 
public Button getButton(int whichButton) {
        return mAlert.getButton(whichButton);
}
所以 可以通过以下代码获取
Button mNegativeButton = mAlertDialog.getButton(AlertDialog.BUTTON_NEGATIVE) ;
2、设置Button的字体颜色为绿色,同时也可以设置点击状态
mNegativeButton.setTextColor(0xff45c01a);
mNegativeButton.setBackgroundResource(R.drawable.button_selector);
Button的效果已经实现了,同理另一个按钮也可以实现,再来看看 title 的字体颜色, 当然也希望能像获取 Button 一样,获取 title,进入 AlertDialog.java找啊,找啊,结果翻了个底朝天,硬是没有这样的方法。那怎么办?这时候就需要用到 Resources下的一个方法
    public int getIdentifier(String name, String defType, String defPackage) {
        if (name == null) {
            throw new NullPointerException("name is null");
        }
        try {
            return Integer.parseInt(name);
        } catch (Exception e) {
            // Ignore
        }
        return mAssets.getResourceIdentifier(name, defType, defPackage);
    }
这个方法的作用是什么呢?根据方法名可知,获取 Identifier,就是获取识别码,也就是代码中唯一的 Id。那这个方法的三个参数又分别代表什么东西呢? name:资源文件中所需要操作的名称 defType:资源文件中操作的类型 defPackage:资源文件所在的包名 这样说比较难理解,还是举个例子,如果 defType 类型为 id,那么 name 就是android:id=”@+id/id_title”中的id_title 接下来就来看看怎么通过这个方法获取 alertDialog 的 title 1、获取 AlertDialog 中的 title
final int titleId = mContext.getResources().getIdentifier("alertTitle","id","android") ;
        TextView titleTxt = (TextView) mAlertDialog.findViewById(titleId);
“alertTitle”为系统alert_dialog.xml布局文件中title控件的 id 名称android:id=”@+id/alertTitle”,”id”代表获取的是 id,”android”为系统包名
2、设置 title 的字体颜色为绿色
titleTxt.setTextColor(0xff45c01a);
既然拿到了 title 的 View,就可以随心所欲的根据我们需求来设置效果。 再来看看这条绿色的线条和中间内容区域的设置
        final int titleDivider = mContext.getResources().getIdentifier("titleDivider","id","android") ;
        View titleDividerImg =  mAlertDialog.findViewById(titleDivider);
        titleDividerImg.setVisibility(View.VISIBLE);
titleDividerImg.setBackgroundColor(0xff45c01a);
        final int contentPanel = mContext.getResources().getIdentifier("contentPanel","id","android") ;
        LinearLayout contentPanelLayout = (LinearLayout) mAlertDialog.findViewById(contentPanel);
        contentPanelLayout.setVisibility(View.VISIBLE);
        final int message = mContext.getResources().getIdentifier("message","id","android") ;
        TextView messageTextView = (TextView) mAlertDialog.findViewById(message);
        messageTextView.setTextSize(TypedValue.applyDimension(TypedValue.COMPLEX_UNIT_SP,20,mContext.getResources().getDisplayMetrics()));
        messageTextView.setPadding(20,20,20,20);
        messageTextView.setVisibility(View.VISIBLE);
我们回到获取NegativeButton的代码中,其实既然 title 和 titleDivider能通过getIdentifier获取,button 同样能通过getIdentifier来获取,具体实现代码如下:
        final int button1 = mContext.getResources().getIdentifier("button1","id","android") ;
        Button negativeButton = (Button) mAlertDialog.findViewById(button1);
        negativeButton.setBackgroundResource(R.drawable.button_selector);
        negativeButton.setVisibility(View.VISIBLE);
        negativeButton.setTextColor(0xff45c01a);
        final int button2 = mContext.getResources().getIdentifier("button2","id","android") ;
        Button positiveButton = (Button) mAlertDialog.findViewById(button2);
        positiveButton.setBackgroundResource(R.drawable.button_selector);
        positiveButton.setVisibility(View.VISIBLE);
        positiveButton.setTextColor(0xff45c01a);
可以看到,第二张效果图,完全是使用的系统自带的对话框布局实现。 三、归纳 可以看到整篇文章的核心就是
public int getIdentifier(String name, String defType, String defPackage)
掌握了这个方法,对于修改 AlertDialog 就不在话下,当然此方法的用处在这里只能算的上是冰上一脚。 需要对 AlertDialog 的各个控件熟练运用就必须知道系统的alert_dialog.xml定义了那些 View,alert_dialog.xml的路径是 //device/apps/common/res/layout/alert_dialog.xml。 四、alert_dialog.xml的源码
<?xml version="1.0" encoding="utf-8"?>
    <!-- *//* //device/apps/common/res/layout/alert_dialog.xml ** ** Copyright 2006, The Android Open Source Project ** ** Licensed under the Apache License, Version 2.0 (the "License"); ** you may not use this file except in compliance with the License. ** You may obtain a copy of the License at ** ** http://www.apache.org/licenses/LICENSE-2.0 ** ** Unless required by applicable law or agreed to in writing, software ** distributed under the License is distributed on an "AS IS" BASIS, ** WITHOUT WARRANTIES OR CONDITIONS OF ANY KIND, either express or implied. ** See the License for the specific language governing permissions and ** limitations under the License. *//* -->
    <LinearLayout  xmlns:android="http://schemas.android.com/apk/res/android" android:id="@+id/parentPanel" android:layout_width="match_parent" android:layout_height="wrap_content" android:orientation="vertical" android:paddingTop="9dip" android:paddingBottom="3dip" android:paddingStart="3dip" android:paddingEnd="1dip">
    <LinearLayout android:id="@+id/topPanel" android:layout_width="match_parent" android:layout_height="wrap_content" android:minHeight="54dip" android:orientation="vertical">
    <LinearLayout android:id="@+id/title_template" android:layout_width="match_parent" android:layout_height="wrap_content" android:orientation="horizontal" android:gravity="center_vertical" android:layout_marginTop="6dip" android:layout_marginBottom="9dip" android:layout_marginStart="10dip" android:layout_marginEnd="10dip">
    <ImageView android:id="@+id/icon" android:layout_width="wrap_content" android:layout_height="wrap_content" android:layout_gravity="top" android:paddingTop="6dip" android:paddingEnd="10dip" android:src="@drawable/ic_dialog_info" />
    <com.android.internal.widget.DialogTitle android:id="@+id/alertTitle" style="?android:attr/textAppearanceLarge" android:singleLine="true" android:ellipsize="end" android:layout_width="match_parent" android:layout_height="wrap_content" android:textAlignment="viewStart" />
    </LinearLayout>
    <ImageView android:id="@+id/titleDivider" android:layout_width="match_parent" android:layout_height="1dip" android:visibility="gone" android:scaleType="fitXY" android:gravity="fill_horizontal" android:src="@android:drawable/divider_horizontal_dark" />
    <!-- If the client uses a customTitle, it will be added here. -->
    </LinearLayout>
    <LinearLayout android:id="@+id/contentPanel" android:layout_width="match_parent" android:layout_height="wrap_content" android:layout_weight="1" android:orientation="vertical">
    <ScrollView android:id="@+id/scrollView" android:layout_width="match_parent" android:layout_height="wrap_content" android:paddingTop="2dip" android:paddingBottom="12dip" android:paddingStart="14dip" android:paddingEnd="10dip" android:overScrollMode="ifContentScrolls">
    <TextView android:id="@+id/message" style="?android:attr/textAppearanceMedium" android:layout_width="match_parent" android:layout_height="wrap_content" android:padding="5dip" />
    </ScrollView>
    </LinearLayout>
    <FrameLayout android:id="@+id/customPanel" android:layout_width="match_parent" android:layout_height="wrap_content" android:layout_weight="1">
    <FrameLayout android:id="@+android:id/custom" android:layout_width="match_parent" android:layout_height="wrap_content" android:paddingTop="5dip" android:paddingBottom="5dip" />
    </FrameLayout>
    <LinearLayout android:id="@+id/buttonPanel" android:layout_width="match_parent" android:layout_height="wrap_content" android:minHeight="54dip" android:orientation="vertical" >
    <LinearLayout  style="?android:attr/buttonBarStyle" android:layout_width="match_parent" android:layout_height="wrap_content" android:orientation="horizontal" android:paddingTop="4dip" android:paddingStart="2dip" android:paddingEnd="2dip" android:measureWithLargestChild="true">
    <LinearLayout android:id="@+id/leftSpacer" android:layout_weight="0.25" android:layout_width="0dip" android:layout_height="wrap_content" android:orientation="horizontal" android:visibility="gone" />
    <Button android:id="@+id/button1" android:layout_width="0dip" android:layout_gravity="start" android:layout_weight="1" style="?android:attr/buttonBarButtonStyle" android:maxLines="2" android:layout_height="wrap_content" />
    <Button android:id="@+id/button3" android:layout_width="0dip" android:layout_gravity="center_horizontal" android:layout_weight="1" style="?android:attr/buttonBarButtonStyle" android:maxLines="2" android:layout_height="wrap_content" />
    <Button android:id="@+id/button2" android:layout_width="0dip" android:layout_gravity="end" android:layout_weight="1" style="?android:attr/buttonBarButtonStyle" android:maxLines="2" android:layout_height="wrap_content" />
    <LinearLayout android:id="@+id/rightSpacer" android:layout_width="0dip" android:layout_weight="0.25" android:layout_height="wrap_content" android:orientation="horizontal" android:visibility="gone" />
    </LinearLayout>
    </LinearLayout>
    </LinearLayout>
源码下载地址:AlertDialog通过自带的布局实现自定义的风格
