前言
好久没有写博客了,都感觉有些生疏了。 总觉的人对自己要求高一些比较好,这样才进步比较快。接下来会继续给大家带来一些更有用的知识。 个人水平有限,如果感觉我的博客对您有用处,那就留个言给下鼓励;如果那里写的有误,请各位看客老爷多多拍砖! 注意:此处我使用的IDE是Android Studio
入门
相信每个人在学习Android时,都创建过很多Demo工程,那么下面的代码,大家一定非常眼熟了。
public class MainActivity extends Activity {
    @Override
    protected void onCreate(Bundle savedInstanceState) {
        super.onCreate(savedInstanceState);
        // 这句代码是为了讲解方便加的。目的是去掉标题。
        requestWindowFeature(Window.FEATURE_NO_TITLE);
        setContentView(R.layout.activity_main);
    }
}
代码的主要目的是,将布局文件activity_main.xml展现到屏幕上。运行后的效果如下: 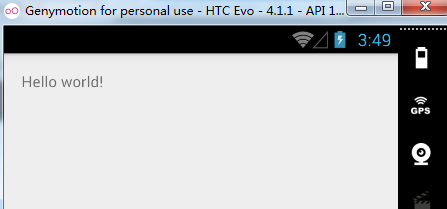 使用过
使用过View.inflate()方法的朋友,肯定知道这个方法可以将一个XML布局文件,填充为一个View对象,相应的上面的代码就可以转化为这样子了:
View view = View.inflate(this, R.layout.activity_main, null);
setContentView(view);
是不是感觉到了一丝丝的奇怪? Google作为一个伟大公司,里面的程序员也绝对都是大牛级别的人物,他们对方法的命名是肯定可以起到“见名知意”的作用的。 那么,问题来了。我们明明是给MainActivity设置activity_main布局,应该使用这样命名的方法setView(view)才会显得更专业呀! 这里为什么使用的是setContentView(view)呢? 其实,我们的布局都是被放置在一个FrameLayout的布局中的,由于此处就是给FrameLayout设置内容,那么使用setContentView(view)也就不奇怪了? 在activity_main.xml中给根据加上id,获取一下它的父亲来看看它到底是什么吧。
protected void onCreate(Bundle savedInstanceState) {
       super.onCreate(savedInstanceState);
       requestWindowFeature(Window.FEATURE_NO_TITLE);
       View view = View.inflate(this, R.layout.activity_main, null);
       setContentView(view);
       RelativeLayout relativeLayout = (RelativeLayout) findViewById(R.id.rl_main);
       ViewParent parent = relativeLayout.getParent();
       System.out.println(parent);
   }
打印的结果如下:  可以看到,activity_main.xml被转化成为一个View之后,确实放置在FrameLayout中了。看到此处,相信你一定明白了,为什么调用的是
setContentView(view)而不是setView()了。 当然,到目前为止还都是开胃菜! 应用从启动到页面展示,Android系统都为我们额外做了哪些工作,请继续往下看!
视图树
为了搞清Android系统都为我们做了哪些额外的工作以及应用的视图树是怎么样的,就需要用到SDK的一个工具了,它放在了SDK目录下:/SDK/tools/hierarchyviewer.bat。 双击打开后,会看到如下的视图,其中黑色显示的是当前手机或者模拟器正在运行的APP。 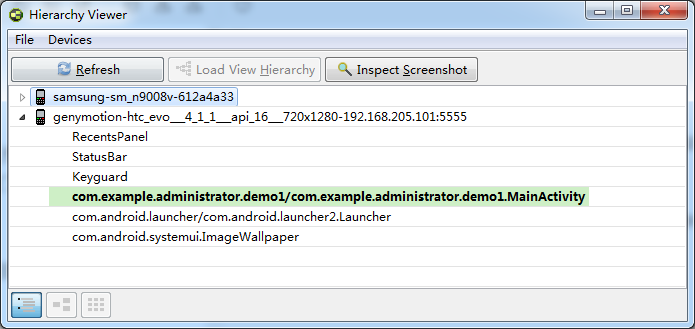 双击进入黑色条目进入后,会看到下面的视图。这里面就是视图树了。
 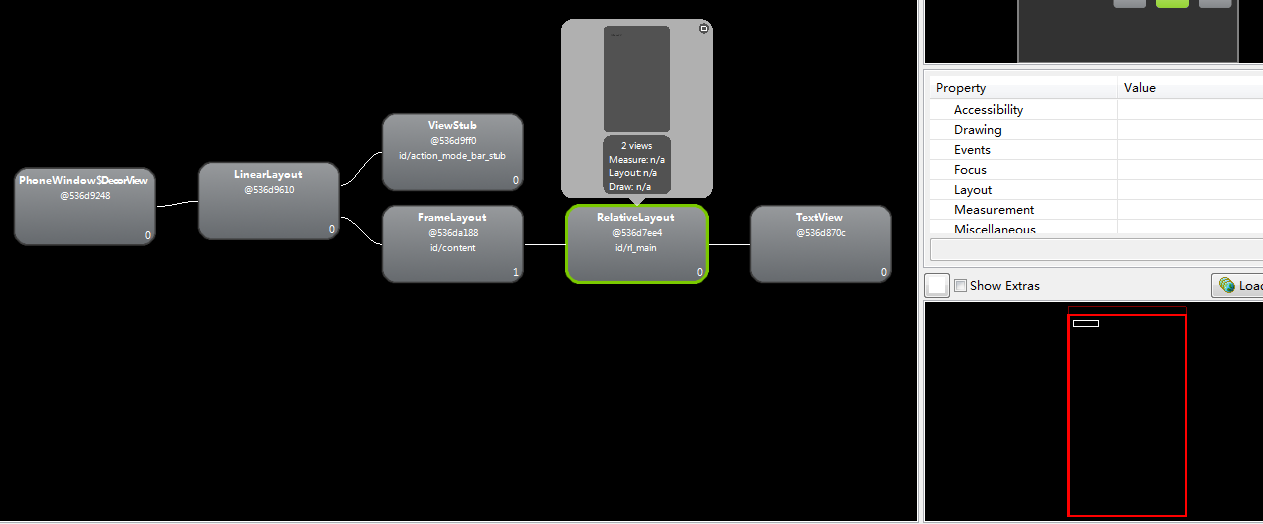 这个工具可以帮我们显示项目的View层级关系,在代码中由于去除掉了标题栏,所以显得清爽了很多。而绿色被选中的,就是我们R.layout.main布局文件了,右下方红色的代表屏幕上布局文件的区域。 就如我们上面所说的,Relativilayout布局是被嵌套在一个id为content的FrameLayout中的,这样也可以印证,在
onCreate()方法中,为什么设置布局的方法叫做setContetnView(view),而不是setView(view)了。而ViewStub是一个懒加载的空间,不占大小,默认为0,我们也就不用关心了。 从左侧开始看,当我们选中PhoneWindow$DectorView时,会发现右侧整个APP代表的屏幕空间都会以红色为边框亮起,这样就间接说明了DectorView是根布局了(暂且这么说,其实顶端还有个ViewRoot)。  补充一下,在这个视图中,
PhoneWindow$DectoryView这种形式的,$之前是代表着一个类,$之后是代表这个这个类中的一个内部类。
源码分析
了解这些,还远远不够,再进一步看看源码吧。此处,我的源码版本是API22的,使用的IDE是Android Studio。 点击setContentView(view)方法,看一下内部实现,会发现调用了getWindow()然后调用了其内部的setContentView()方法。
public void setContentView(View view) {
    getWindow().setContentView(view);
    initWindowDecorActionBar();
}
而getWindow()返回一个mWindow,mWindow是一个Window的变量,我们继续跟进一下,看看一下Widnow的源码,可以发现Window是一个抽象类,setContentView()也是要求子类实现的抽象方法。
public abstract void setContentView(int layoutResID);
发现Window是一个抽象类,那么肯定会有它的实现类,在AS中,Ctrl+H,会发现Window的默认实现类是PhoneWindow,由于PhoneWindow被Google隐藏了,在Eclipse中,无法直接看到。 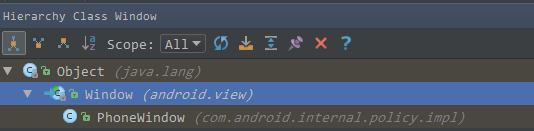 找到PhoneWindow中的
setContentView()方法,app第一次加载时mContentParent肯定为null,所以会调用installDecor()。走完installDecor()方法后,mContentParent也就有值了(可以推测出mContentParent就是FrameLayout),在第二个★处,使用布局填充器将activity_main.xml转化为View对象,并放置到mContentParent中。
@Override
public void setContentView(int layoutResID) {
    if (mContentParent == null) {
        // ★
        installDecor();
    } else if (!hasFeature(FEATURE_CONTENT_TRANSITIONS)) {
        mContentParent.removeAllViews();
    }
    if (hasFeature(FEATURE_CONTENT_TRANSITIONS)) {
        final Scene newScene = Scene.getSceneForLayout(mContentParent, layoutResID,
                getContext());
        transitionTo(newScene);
    } else {
        // ★
        mLayoutInflater.inflate(layoutResID, mContentParent);
    }
    final Callback cb = getCallback();
    if (cb != null && !isDestroyed()) {
        cb.onContentChanged();
    }
}
installDecor()是初始化装饰的意思,可以推测出,在这个方法中Android系统为我们做了很多操作,我们跟进一下。这个方法有200多行,此处只给出重要逻辑。
private void installDecor() {
      if (mDecor == null) {
          // ★ 生成装饰
          mDecor = generateDecor();
          mDecor.setDescendantFocusability(ViewGroup.FOCUS_AFTER_DESCENDANTS);
          mDecor.setIsRootNamespace(true);
          if (!mInvalidatePanelMenuPosted && mInvalidatePanelMenuFeatures != 0) {
              mDecor.postOnAnimation(mInvalidatePanelMenuRunnable);
          }
      }
      if (mContentParent == null) {
          // ★
          mContentParent = generateLayout(mDecor);
          // Set up decor part of UI to ignore fitsSystemWindows if appropriate.
          mDecor.makeOptionalFitsSystemWindows();
          ......
       }
}
当首次进入此方法时,mDecor肯定为null,那么必然会进入到generateDecor()方法,见其名知其意,就是生成装饰的意思。继续跟进一下。
protected DecorView generateDecor() {
    return new DecorView(getContext(), -1);
}
方法很简单,new一个DecorView对象,第一个参数是上下文,那么第二个-1是代表什么呢?打开继承树,可以看到DecorView继承自一个FrameLayout,而FrameLayout是ViewGroup的孩子。 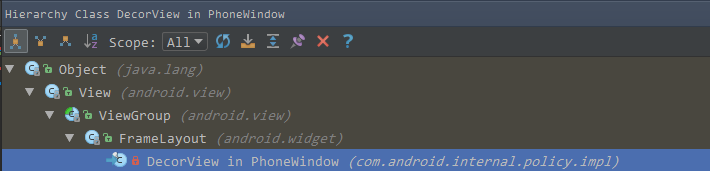
在ViewGroup中可以找到如下信息:
public static final int MATCH_PARENT = -1;
public static final int WRAP_CONTENT = -2;
传入-1说明,DécorView对象默认填充屏幕,这也与我们在Hierarchy-Viwer中看到的现象一致。拿到mDecor后,继续向下走,由于mContentParent肯定为null,会走到 generateLayout(mDecor);方法中,并将mDecor传入。我们继续跟进,方法的含义是,根据装饰生成布局,源码很长,此处只给出关键一些的。
protected ViewGroup generateLayout(DecorView decor) {
    // Apply data from current theme.
    // 省略若干代码
    ... ... ...
    // Inflate the window decor.
    int layoutResource;
    int features = getLocalFeatures();
    // System.out.println("Features: 0x" + Integer.toHexString(features));
    if ((features & (1 << FEATURE_SWIPE_TO_DISMISS)) != 0) {
        layoutResource = R.layout.screen_swipe_dismiss;
    } else if ((features & ((1 << FEATURE_LEFT_ICON) | (1 << FEATURE_RIGHT_ICON))) != 0) {
        if (mIsFloating) {
            TypedValue res = new TypedValue();
            getContext().getTheme().resolveAttribute(
                    R.attr.dialogTitleIconsDecorLayout, res, true);
            layoutResource = res.resourceId;
        } else {
            layoutResource = R.layout.screen_title_icons;
        }
        // XXX Remove this once action bar supports these features.
        removeFeature(FEATURE_ACTION_BAR);
        // System.out.println("Title Icons!");
    } else if ((features & ((1 << FEATURE_PROGRESS) | (1 << FEATURE_INDETERMINATE_PROGRESS))) != 0
            && (features & (1 << FEATURE_ACTION_BAR)) == 0) {
        // Special case for a window with only a progress bar (and title).
        // XXX Need to have a no-title version of embedded windows.
        layoutResource = R.layout.screen_progress;
        // System.out.println("Progress!");
    } else if ((features & (1 << FEATURE_CUSTOM_TITLE)) != 0) {
        // Special case for a window with a custom title.
        // If the window is floating, we need a dialog layout
        if (mIsFloating) {
            TypedValue res = new TypedValue();
            getContext().getTheme().resolveAttribute(
                    R.attr.dialogCustomTitleDecorLayout, res, true);
            layoutResource = res.resourceId;
        } else {
            layoutResource = R.layout.screen_custom_title;
        }
        // XXX Remove this once action bar supports these features.
        removeFeature(FEATURE_ACTION_BAR);
    } else if ((features & (1 << FEATURE_NO_TITLE)) == 0) {
        // If no other features and not embedded, only need a title.
        // If the window is floating, we need a dialog layout
        if (mIsFloating) {
            TypedValue res = new TypedValue();
            getContext().getTheme().resolveAttribute(
                    R.attr.dialogTitleDecorLayout, res, true);
            layoutResource = res.resourceId;
        } else if ((features & (1 << FEATURE_ACTION_BAR)) != 0) {
            layoutResource = a.getResourceId(
                    R.styleable.Window_windowActionBarFullscreenDecorLayout,
                    R.layout.screen_action_bar);
        } else {
            // ★★★★★
            layoutResource = R.layout.screen_title;
        }
        // System.out.println("Title!");
    } else if ((features & (1 << FEATURE_ACTION_MODE_OVERLAY)) != 0) {
        layoutResource = R.layout.screen_simple_overlay_action_mode;
    } else {
        // Embedded, so no decoration is needed.
        layoutResource = R.layout.screen_simple;
        // System.out.println("Simple!");
    }
    mDecor.startChanging();
    View in = mLayoutInflater.inflate(layoutResource, null);
    decor.addView(in, new ViewGroup.LayoutParams(MATCH_PARENT, MATCH_PARENT));
    mContentRoot = (ViewGroup) in;
    // 省略若干代码
    ... ...
    return contentParent;
}
我们在之前使用了requestWindowFeature(Window.FEATURE_NO_TITLE);给窗体设置了一个装饰,我们直接来到关键的代码处。在此处会不断的判断features到底是什么东西,经过一堆判断后,会达到上面代码中★★★★★处。
if ((features & (1 << FEATURE_NO_TITLE)) == 0) {
     ... ...
     // ★★★★★
     layoutResource = R.layout.screen_title;
}
这样走到这个if中,并得到一个layoutResource,它其实就是一个XML的布局,我们接着看一下R.layout.screen_title是什么样的布局。 R.layout.screen_title内容如下,一个LinearLayout中包含着两个FragmenLayout和一个ViewStub,由于我们设置了没有Title,那么第二个FrameLayout就不会显示出来,第三个就是我们id=content的帧布局。看到此处,是不是渐渐有些清晰了?
<LinearLayout xmlns:android="http://schemas.android.com/apk/res/android" android:orientation="vertical" android:fitsSystemWindows="true">
    <!-- Popout bar for action modes -->
    <ViewStub android:id="@+id/action_mode_bar_stub" android:inflatedId="@+id/action_mode_bar" android:layout="@layout/action_mode_bar" android:layout_width="match_parent" android:layout_height="wrap_content" android:theme="?attr/actionBarTheme" />
    <FrameLayout  android:layout_width="match_parent" android:layout_height="?android:attr/windowTitleSize" style="?android:attr/windowTitleBackgroundStyle">
        <TextView android:id="@android:id/title" style="?android:attr/windowTitleStyle" android:background="@null" android:fadingEdge="horizontal" android:gravity="center_vertical" android:layout_width="match_parent" android:layout_height="match_parent" />
    </FrameLayout>
    <FrameLayout android:id="@android:id/content" android:layout_width="match_parent" android:layout_height="0dip" android:layout_weight="1" android:foregroundGravity="fill_horizontal|top" android:foreground="?android:attr/windowContentOverlay" />
</LinearLayout>
在generateLayout(DecorView decor)方法的如下代码中,将screen_titlle.xml文件转化成的View对象添加到了decor中,也就是PhoneWindow$DecorView中。
View in = mLayoutInflater.inflate(layoutResource, null);
decor.addView(in, new ViewGroup.LayoutParams(MATCH_PARENT, MATCH_PARENT));
mContentRoot = (ViewGroup) in;
最后,再回到PhoneWindow的setContentView(resId)方法中,在378行通过mLayoutInflater.inflate(layoutResID, mContentParent);将我们自己的布局文件,放置到mContentParent中。 至此,整个View界面的挂载与显示就结束了。
如果感觉,本篇博客讲的对你还有益处,请多多留言;如果讲的有误,也请多多拍砖,谢谢大家了!!!